Navigation menu
The world is reeling from the scale of the coronavirus COVID-19 pandemic and the effect that it’s having on people’s lives, and their livelihoods. In the UK, non-essential brick and mortar retail businesses are now forced to close their doors to help stop the spread of the virus, and people everywhere are told to stay at home and do their shopping online.
While this is an uncertain time for the economy, one thing is clear. People still need to buy goods, and they need to get those goods delivered. So if you run a local retail business that’s had to shut up shop, there’s still an opportunity for you to carry on operating, through e-commerce software and by providing a local delivery service.
Here's how to do it.
In this post:
- Step 1: Adding your products to your Shopify store
- Step 2: Customizing the design of your store
- Step 3: Setting up automated customer notifications
- Step 4: Launch your store
- Other Shopify information you need to know
Tools and guides for later:
- How to Find Shopify Store Theme
- Push Notification Preview Tool for Windows, Android, & Mac
- 15 Awesome Email Marketing Examples for Inspiration
Promote your new store with emails and SMS
add firepush to shopifyStep 1: Adding your products to your Shopify store
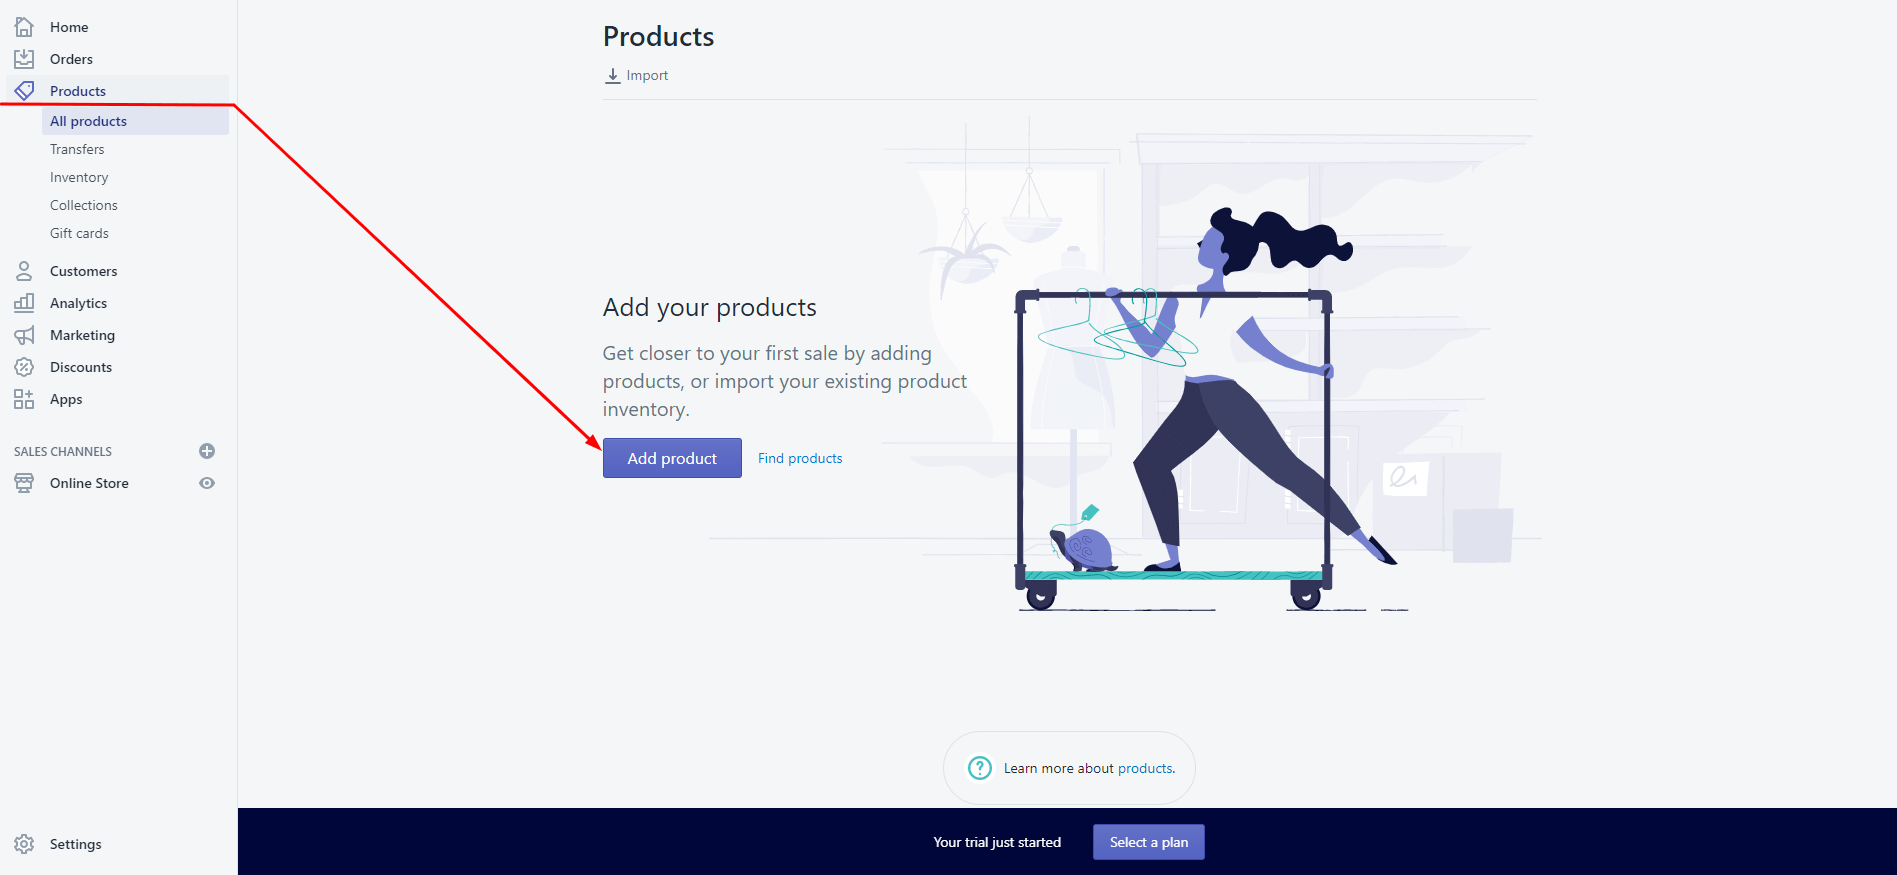
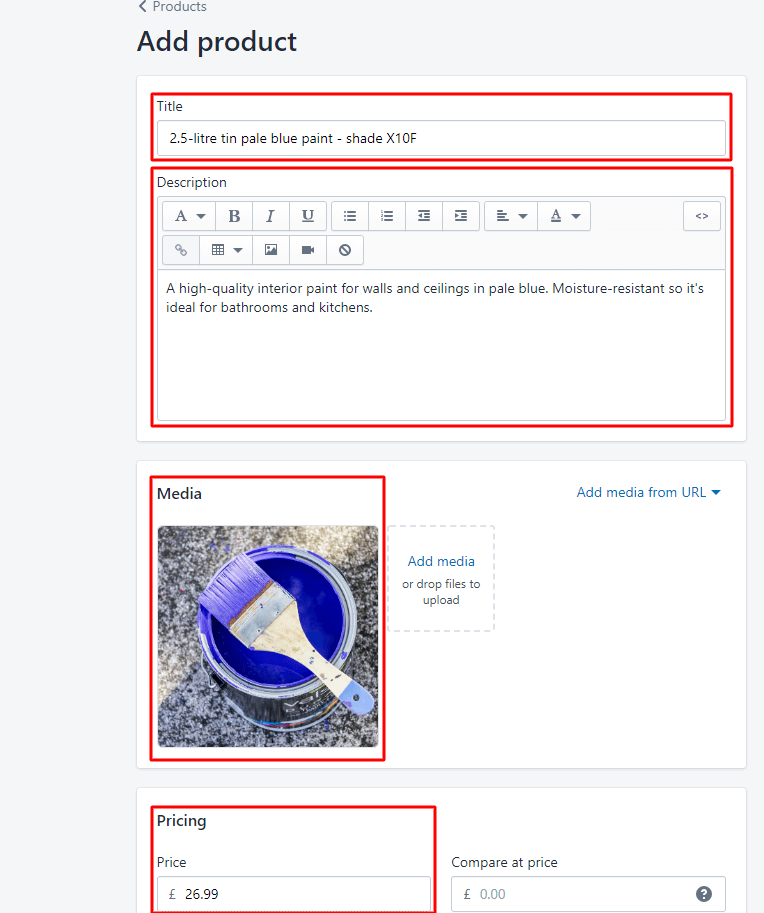
On the left-hand menu, click on ‘Products’ and then on the blue button ‘Add product’. On the next screen, you’ll need to do four things, as follows:
- Add a descriptive product title.
- Write a detailed product description.
- Add a photo to showcase your product.
- Input the price.
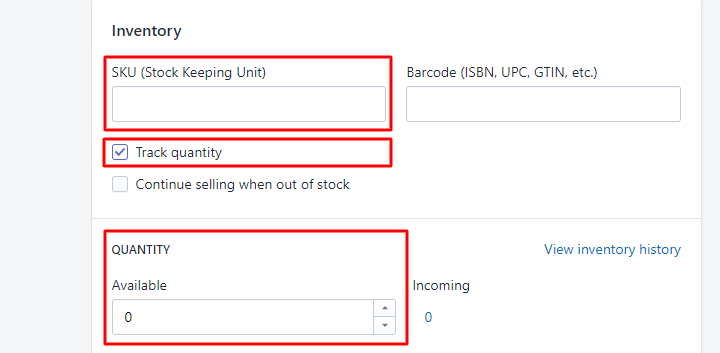
When you’ve done that, you might want to fill out the ‘Inventory’ section which is handy if you have a limited number of products. You can assign an SKU to your product. Clicking ‘Track quantity’ will bring up the quantity box where you can enter how many items you have in stock. The quantity will decrease whenever someone makes a purchase. When the quantity reaches zero, shoppers will no longer be able to buy your product.
Because you or a member of staff will be delivering your products locally, you don’t need to worry about the ‘Shipping’ section. This is only relevant if you’re planning to ship your products using a courier or parcel service.
If you are intending to ship via a courier, you can complete the two sections highlighted below. But as this guide is designed to help you as we go through the coronavirus crisis, we imagine you’ll be delivering your products yourself.

So next you’ll come across the ‘Variants’ section. If you have several variants of the same product, this is where you’d explain them. For example, you may sell three different sized tins of pale blue paint in the shade X10F. And you might have the same size tin of paint in 15 different colors.
Build your business with Shopify
Start FREE 90 days TrialIn this example, we’ve added three different paint tin sizes - 2.5-litre, 5-litre and 60ml (the latter being a tester pot). You can input the different prices and quantities in the ‘Preview’ section.
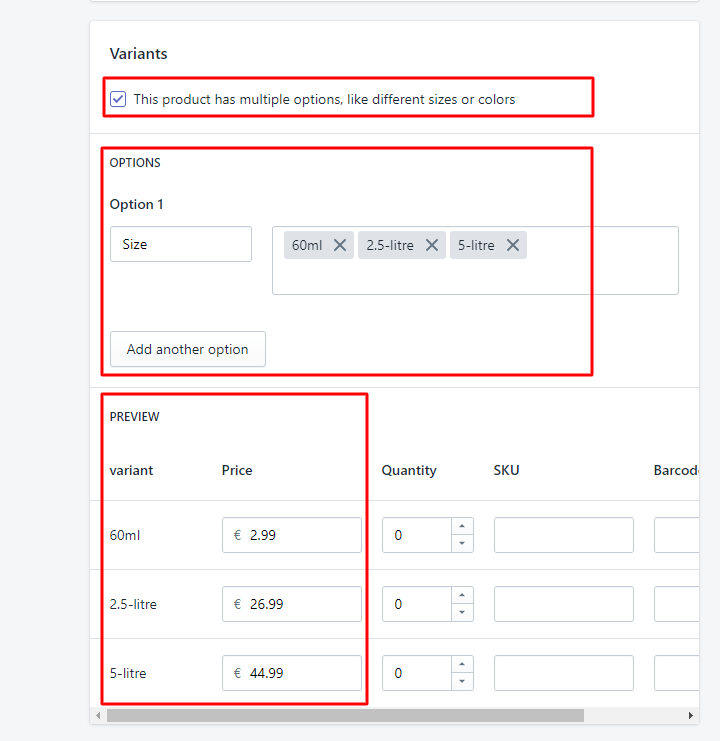
This is pretty much all you need to do to add your products! Click the blue ‘Save’ button which is located at the top right-hand corner and then add some more of your products when you’re ready.
One point to mention...
While you’re setting up your store like this, you may want to install the Firepush app. With Firepush, you can build a database of interested customers automatically via a subscriber popup box that captures permission for marketing and communications.
Let’s say that you’re promoting your temporary online store via your Facebook page. You’ll add the link to your store within a Facebook post and inform your followers that you’re geared up for home deliveries.
When visitors click onto your new online store after reading your Facebook post, you can ask them to opt-into web push notifications through Firepush. And when they’ve opted in, you can easily communicate with your subscribers about what’s happening with your store.
For starters, you can set up an automated welcome message with important details, like how to order, the expected delivery times, and how you’ll leave orders on the doorstep so as to avoid unnecessary contact with customers.
To install the app, visit the ‘Apps section’ of your Shopify dashboard and search for Firepush, or just click on our link above.
Step 2: Customizing the design of your store
Now comes the fun part - playing around with the look and feel of your store! On the left-hand side of your dashboard, click on ‘Online Store’ and then ‘Themes’. There are tons of themes available to you in the Theme library (both free and premium) but to get you up and running quickly, we’ll guide you through how to change the default theme.
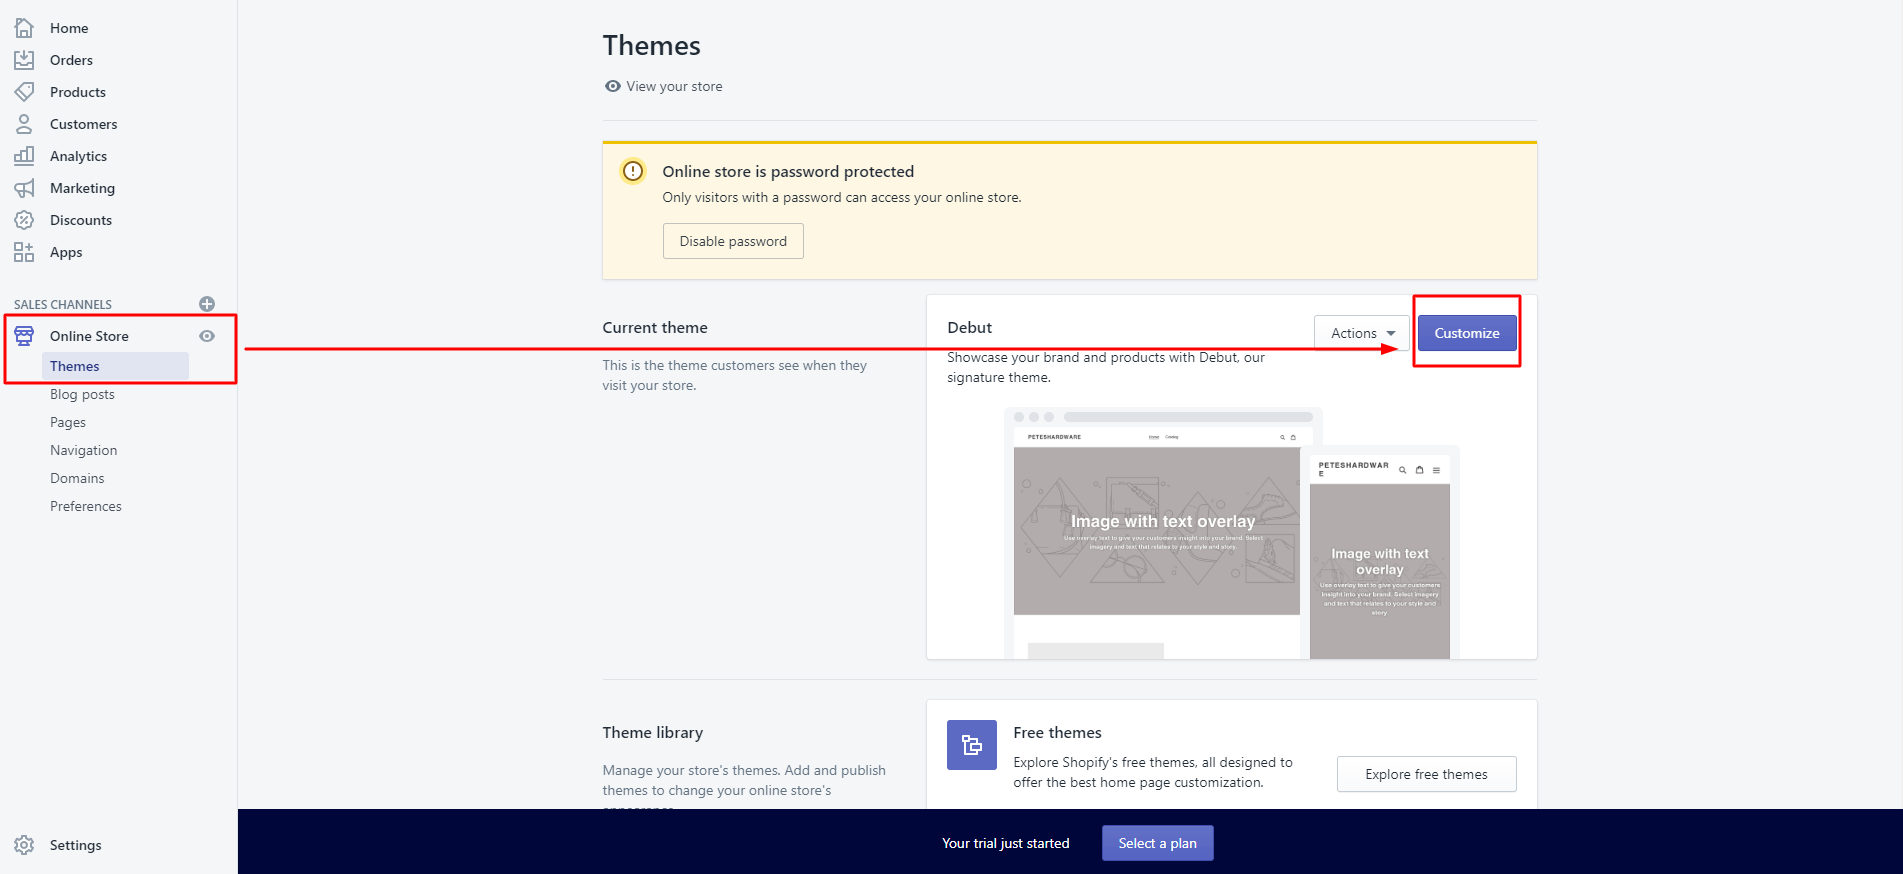
Click on the ‘Customize’ button to get started. You’ll then be taken to this screen:
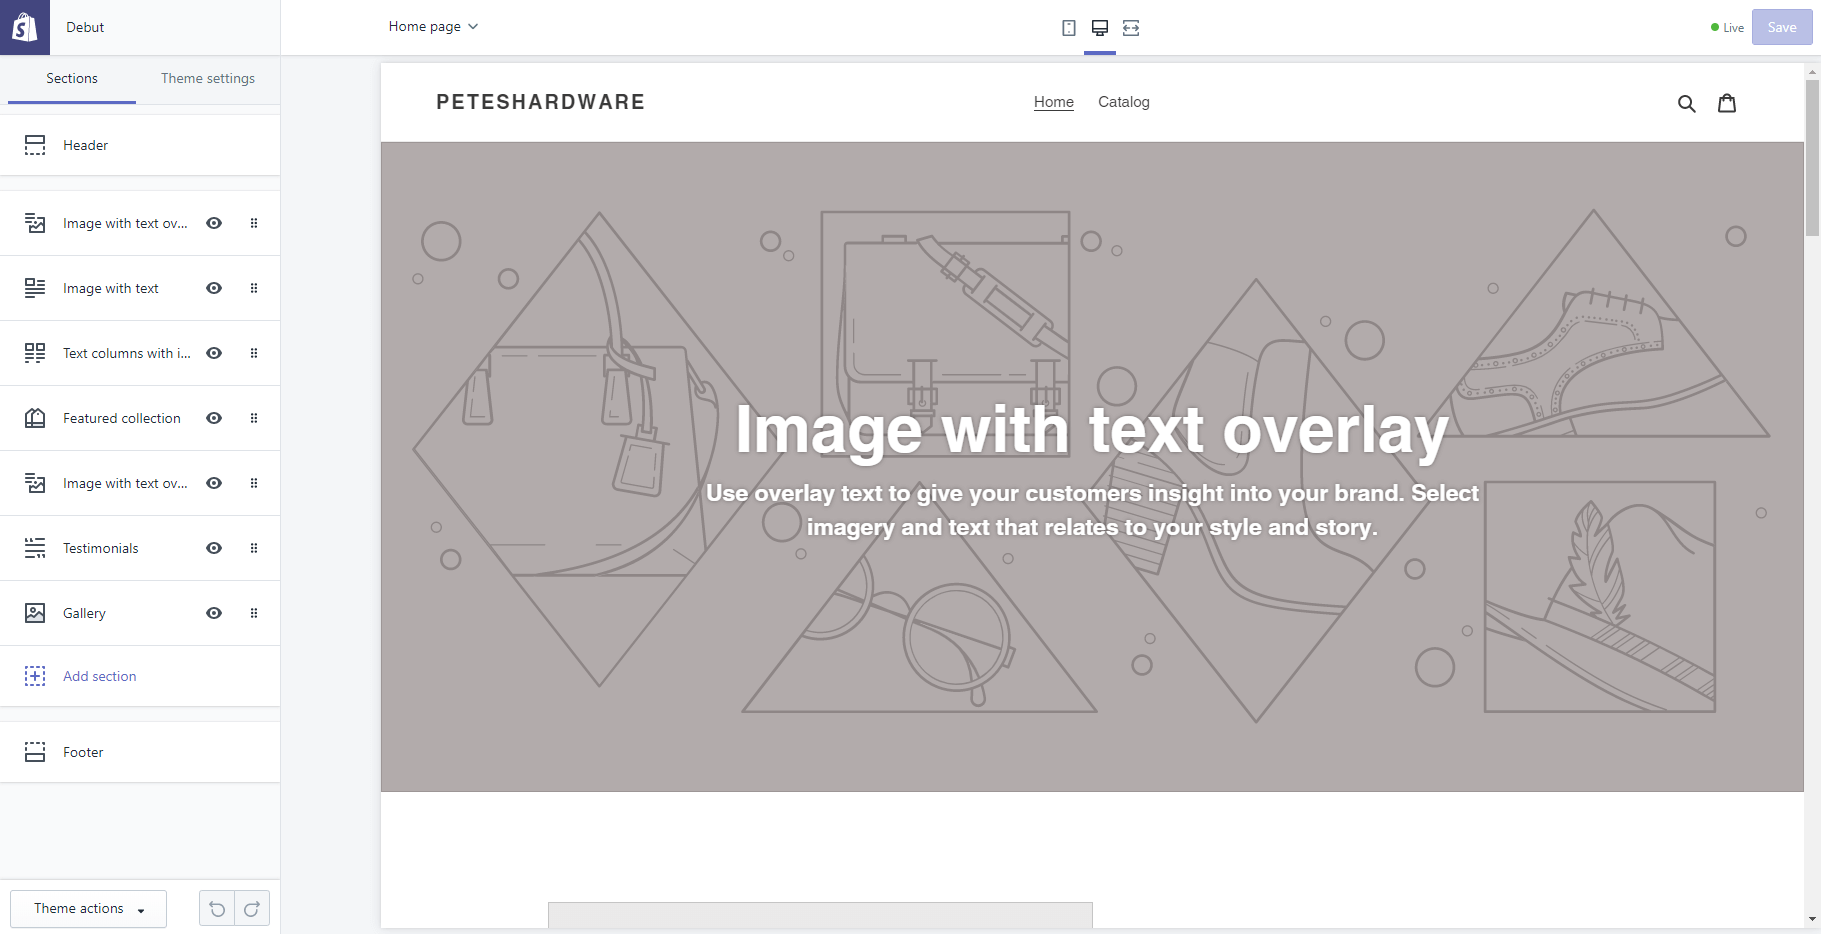
Navigate to ‘Header’ first of all. This is where you can add your logo. Click on the blue ‘Select image’ button on the left. For the purpose of creating a really simple online store, remove the menu for now.

When you’ve finished, you should be able to see your logo and you’ll have a white space at the top of your store.

Go back to the main menu by using the arrow at the top left-hand corner. Next, click on ‘Image with text overlay’ (underneath ‘Header’). Choose your best image for your homepage, one that’s eye-catching and sums up what your store will be offering.
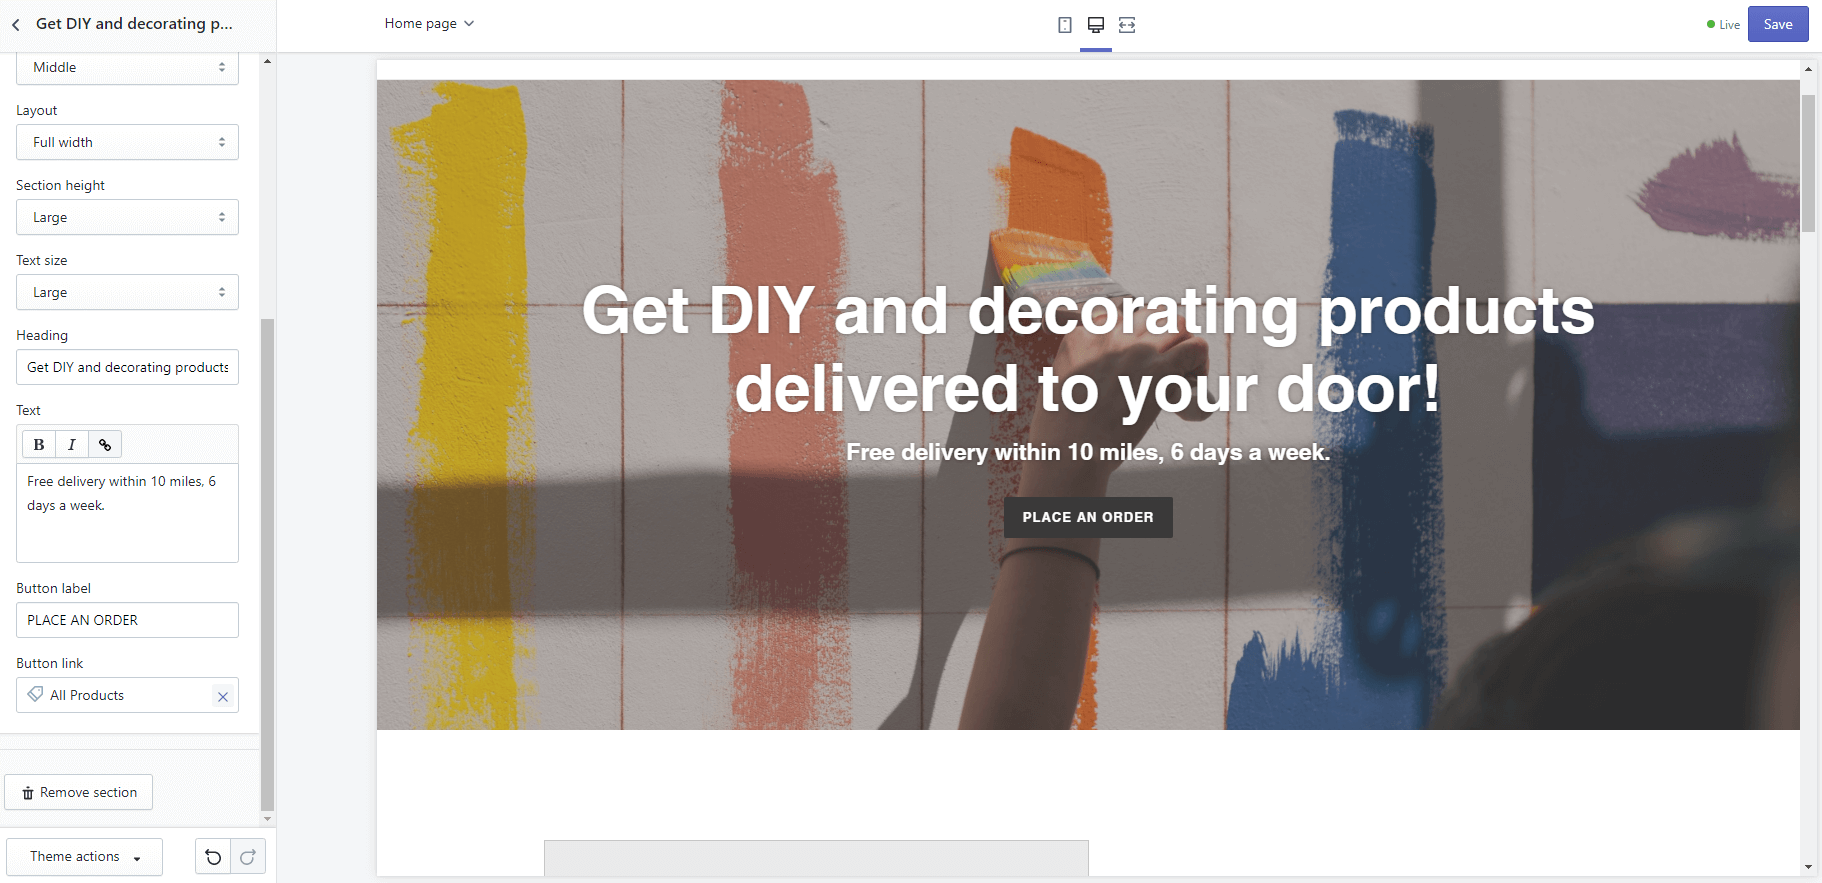
You can also add some text and a call-to-action button to tell your online visitors what you want them to do. The button can link to another page, so you can send visitors directly to browse your products.
So, for example, for Pete’s Hardware, you could have something like this:
Now go back to your main menu and remove most of the other sections such as ‘featured collection’ and ‘testimonials’. These aren’t needed at this stage. You can hide them by clicking on the eye icon next to each section.
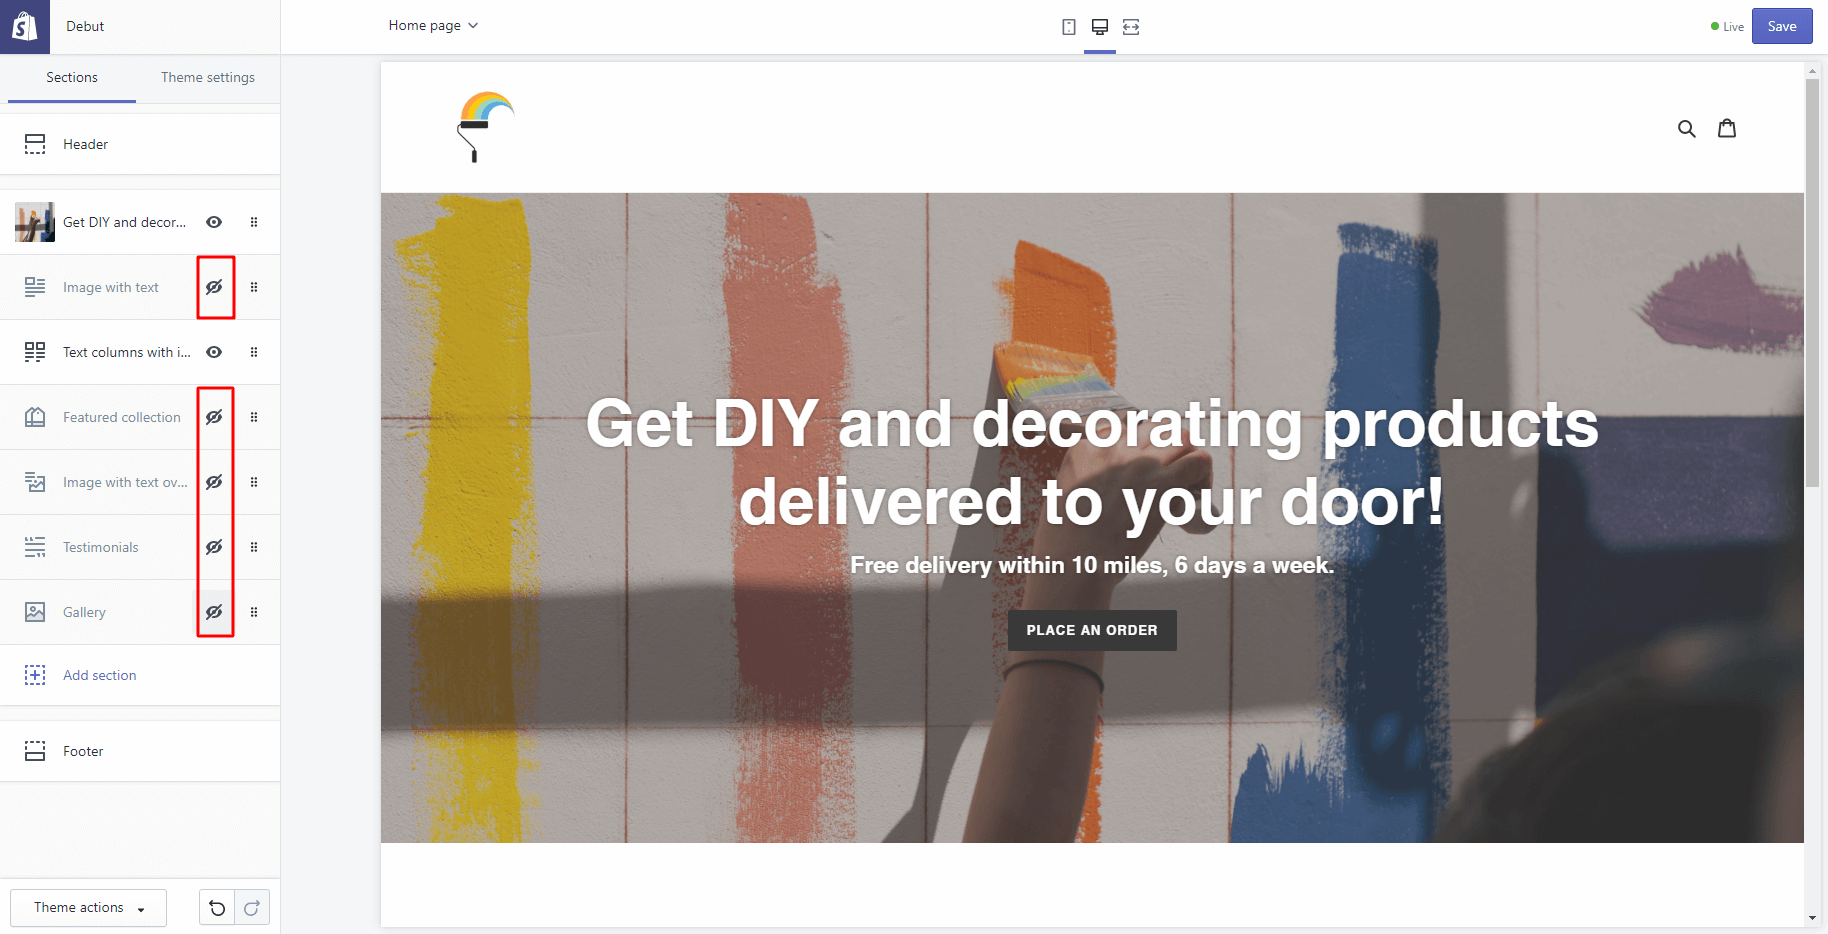
But leave the section ‘Text columns with images’ as you can use this element to provide important information about your products to potential customers.
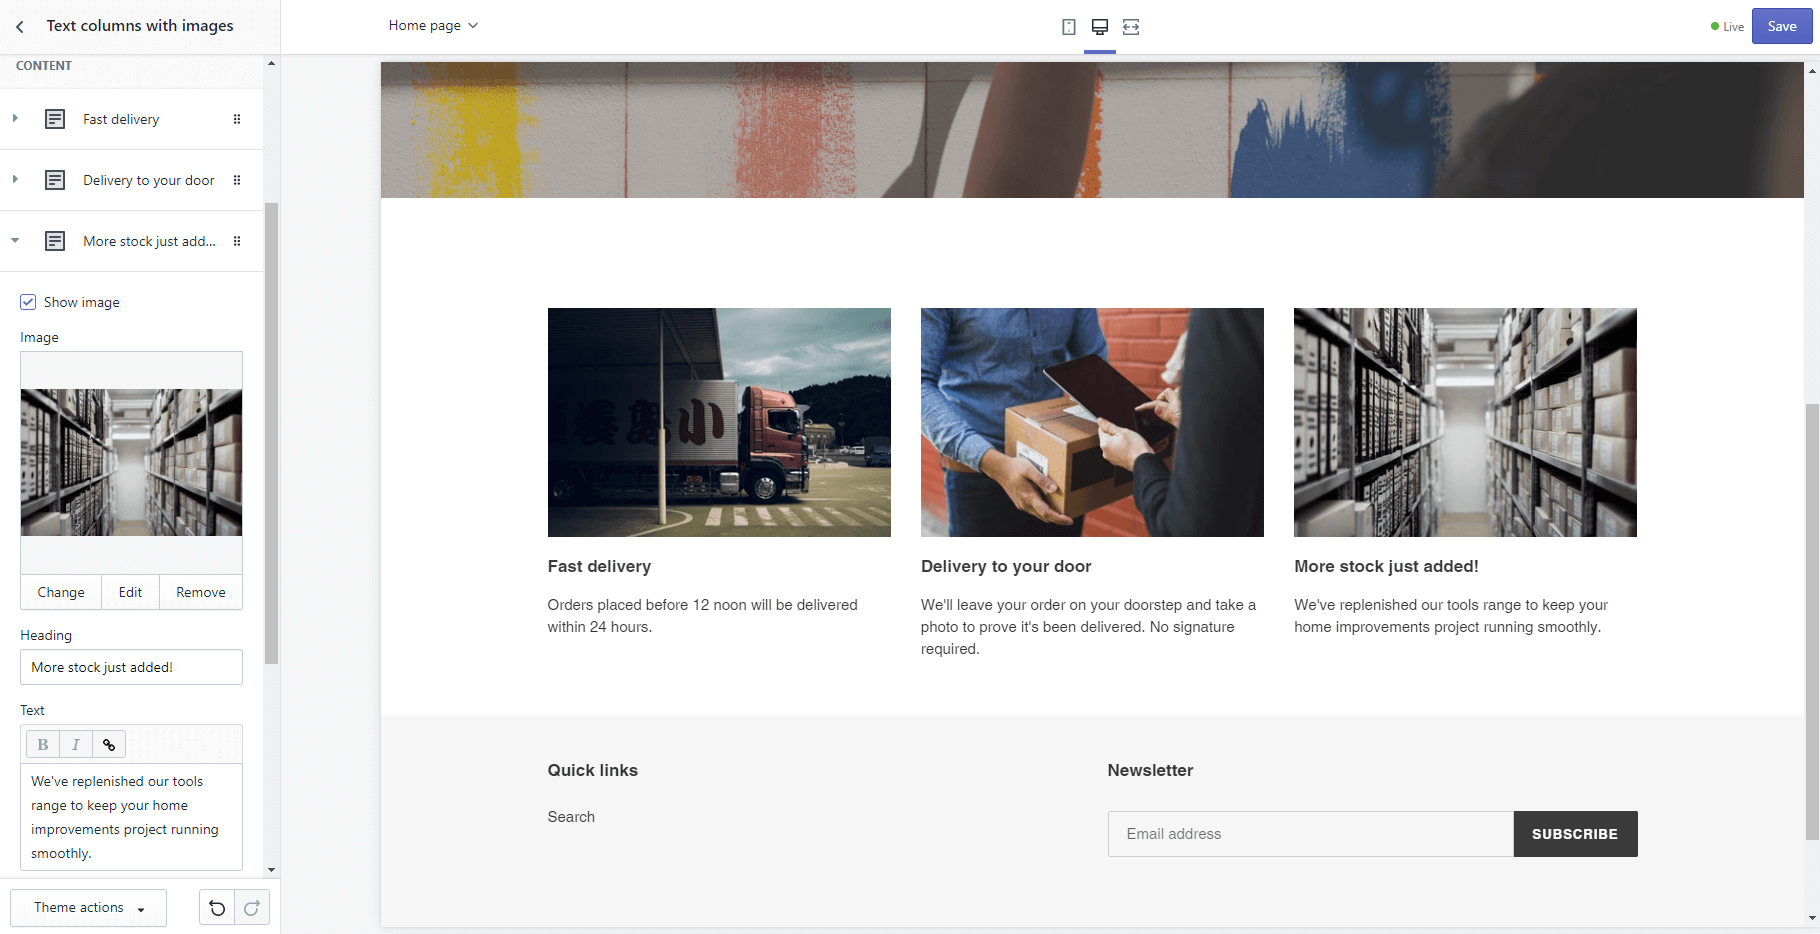
Click on ‘Add a title or tagline’ to edit a column. You can then add an image, a title and text. You could use these areas to explain how your local customers can order from you, or use the columns to provide customers with other key information.
In the screenshot above, you’ll see how we’ve outlined some information you might like to get across to your customers.
Now let’s edit the footer part of your online store and remove bits from there that you might not need at the moment. Click on ‘Footer’, locate ‘Quick Links’ and ‘Newsletter’ and remove content from these areas by clicking ‘Remove content’. See screenshot below.
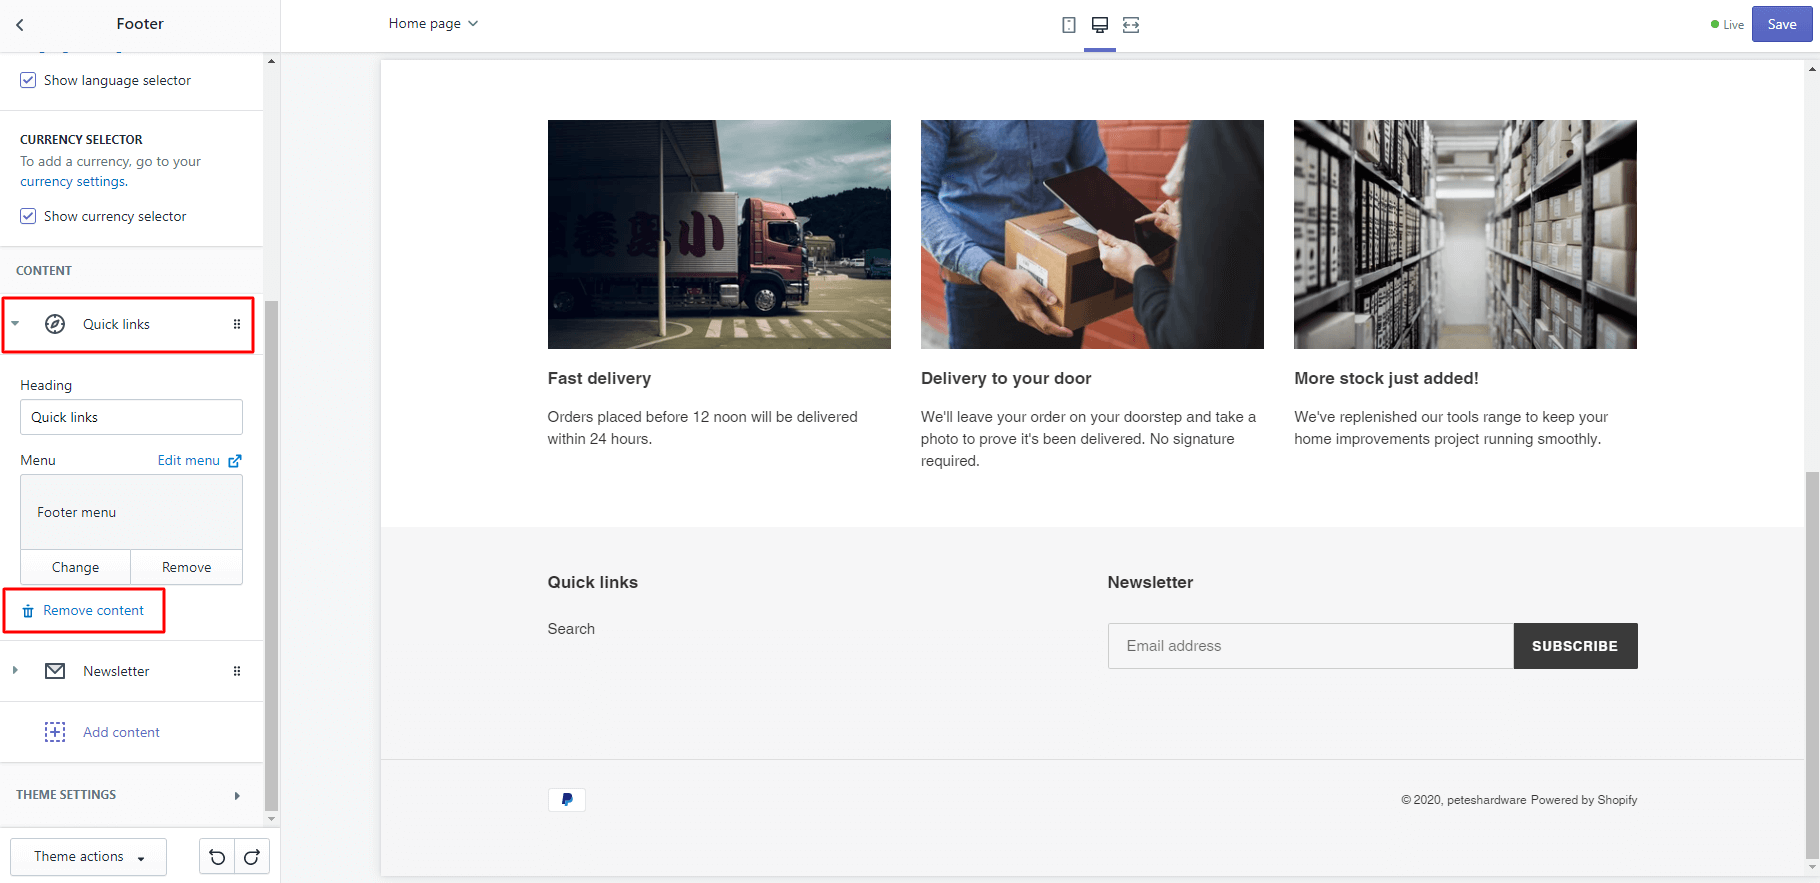
Your homepage is now all set. You can now move onto your product pages. Locate your product pages by clicking the drop-down arrow at the top of your dashboard.
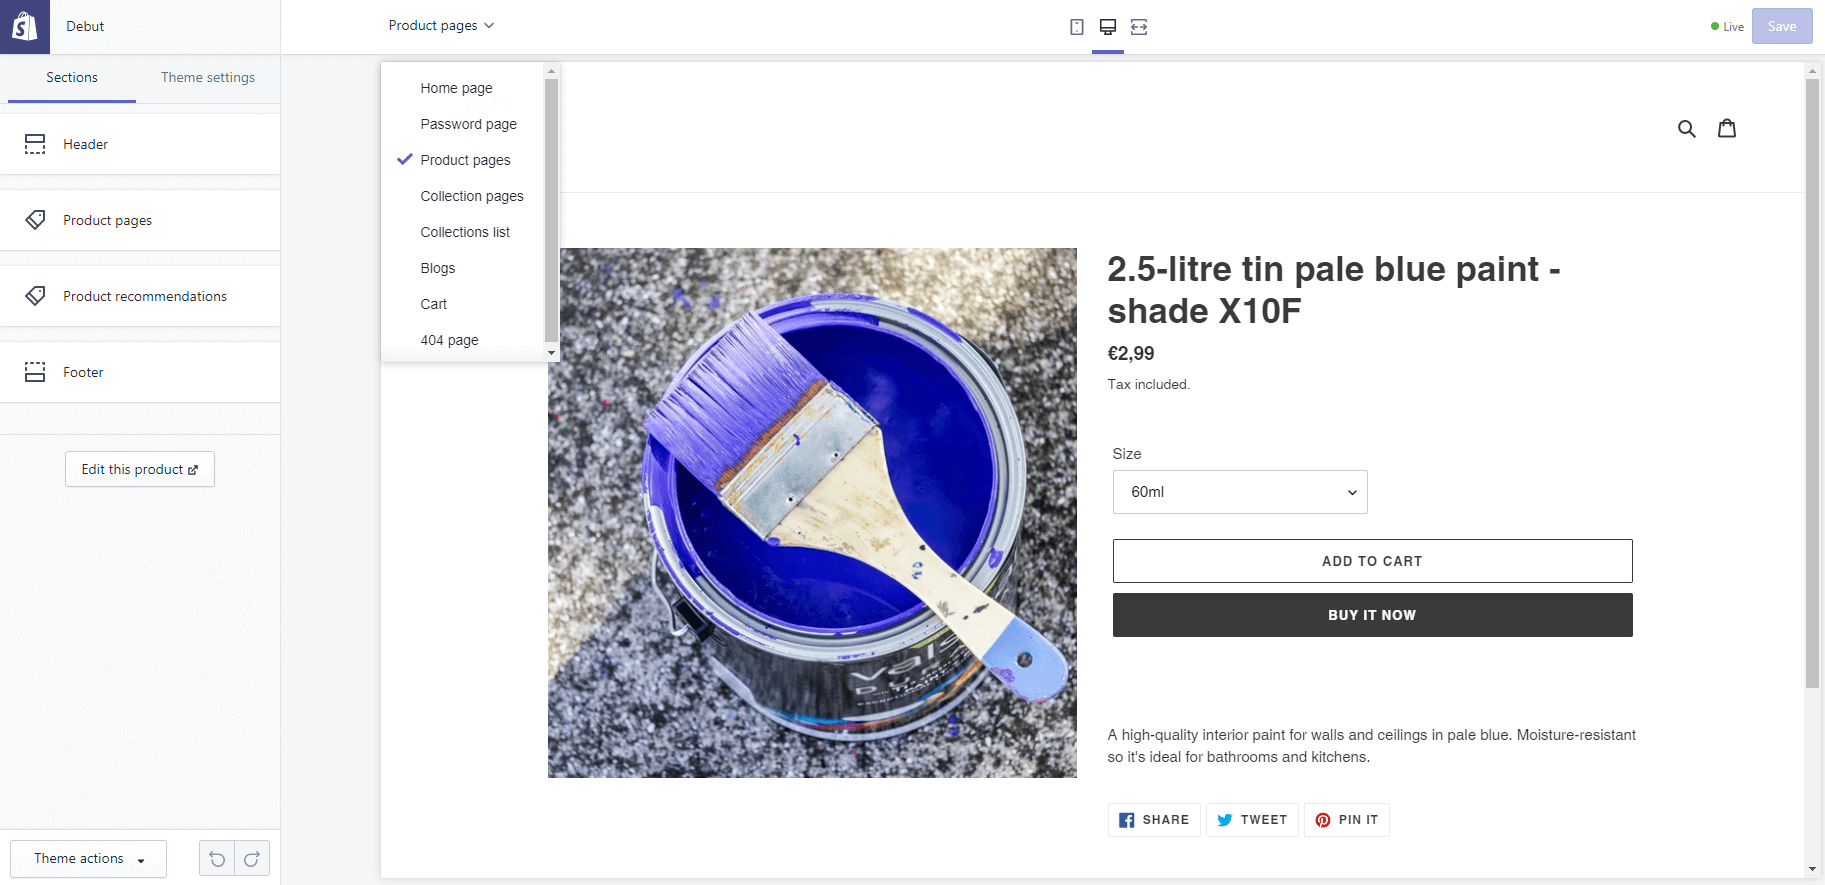
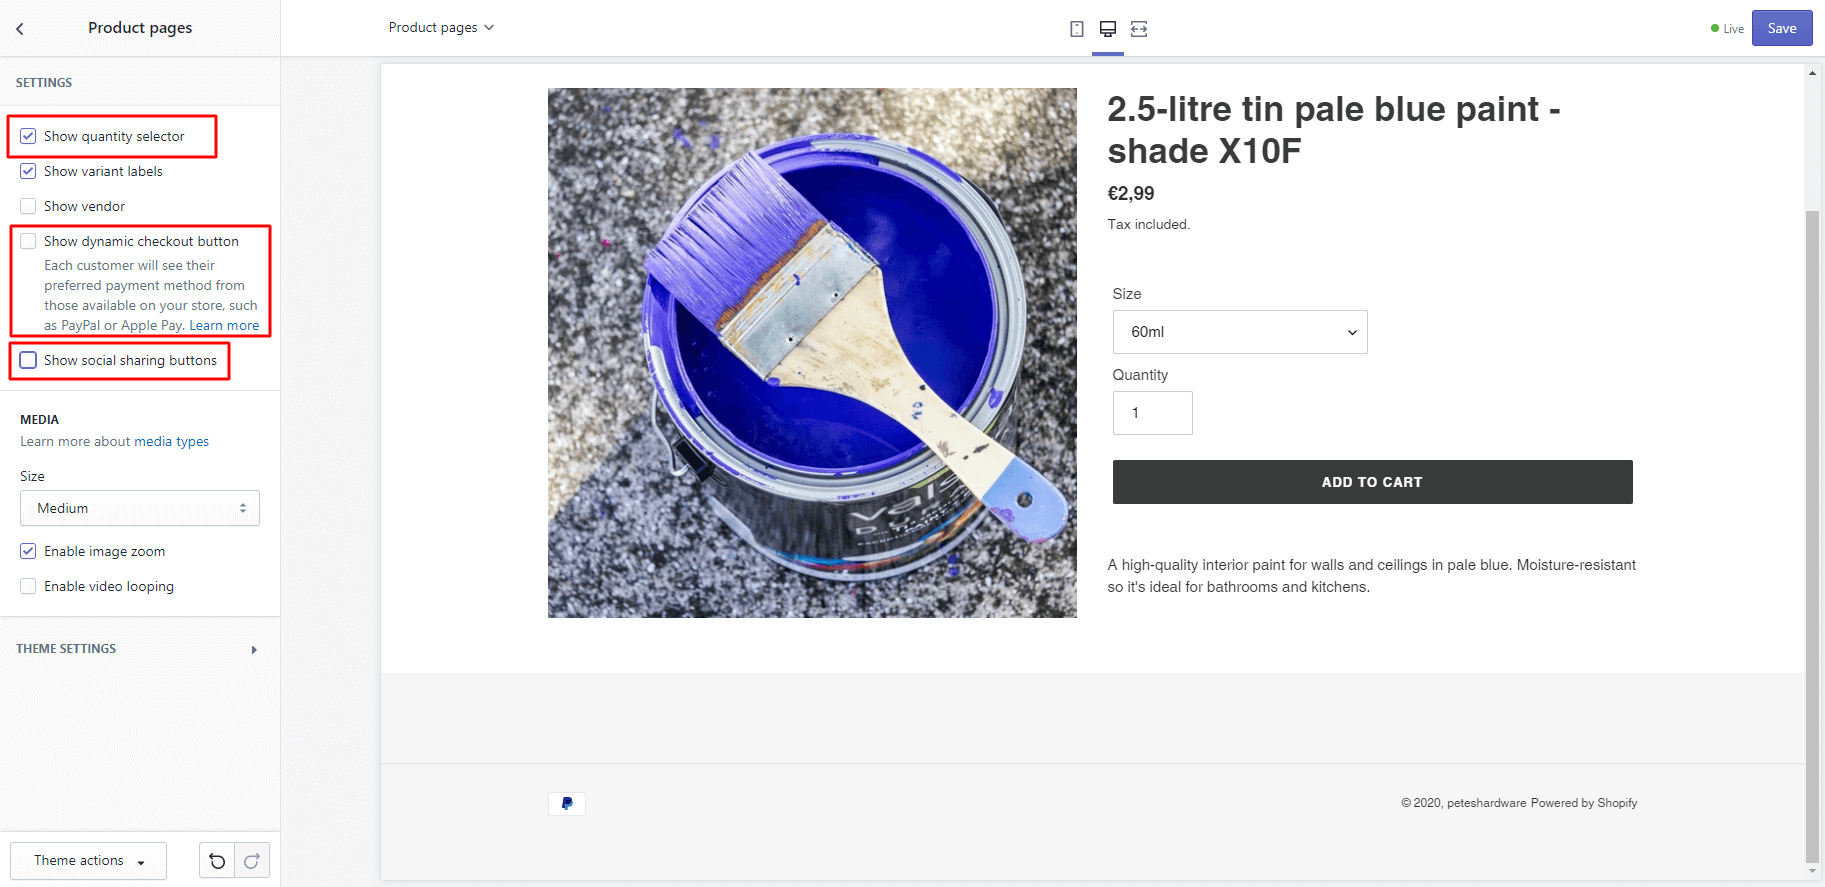
Navigate to ‘Product pages’ via the left-hand menu. Make a few changes here by selecting the checkbox next to ‘Show quantity selector’ and deselecting the checkboxes next to ‘Show dynamic checkout button’ and ‘Show social sharing buttons’.
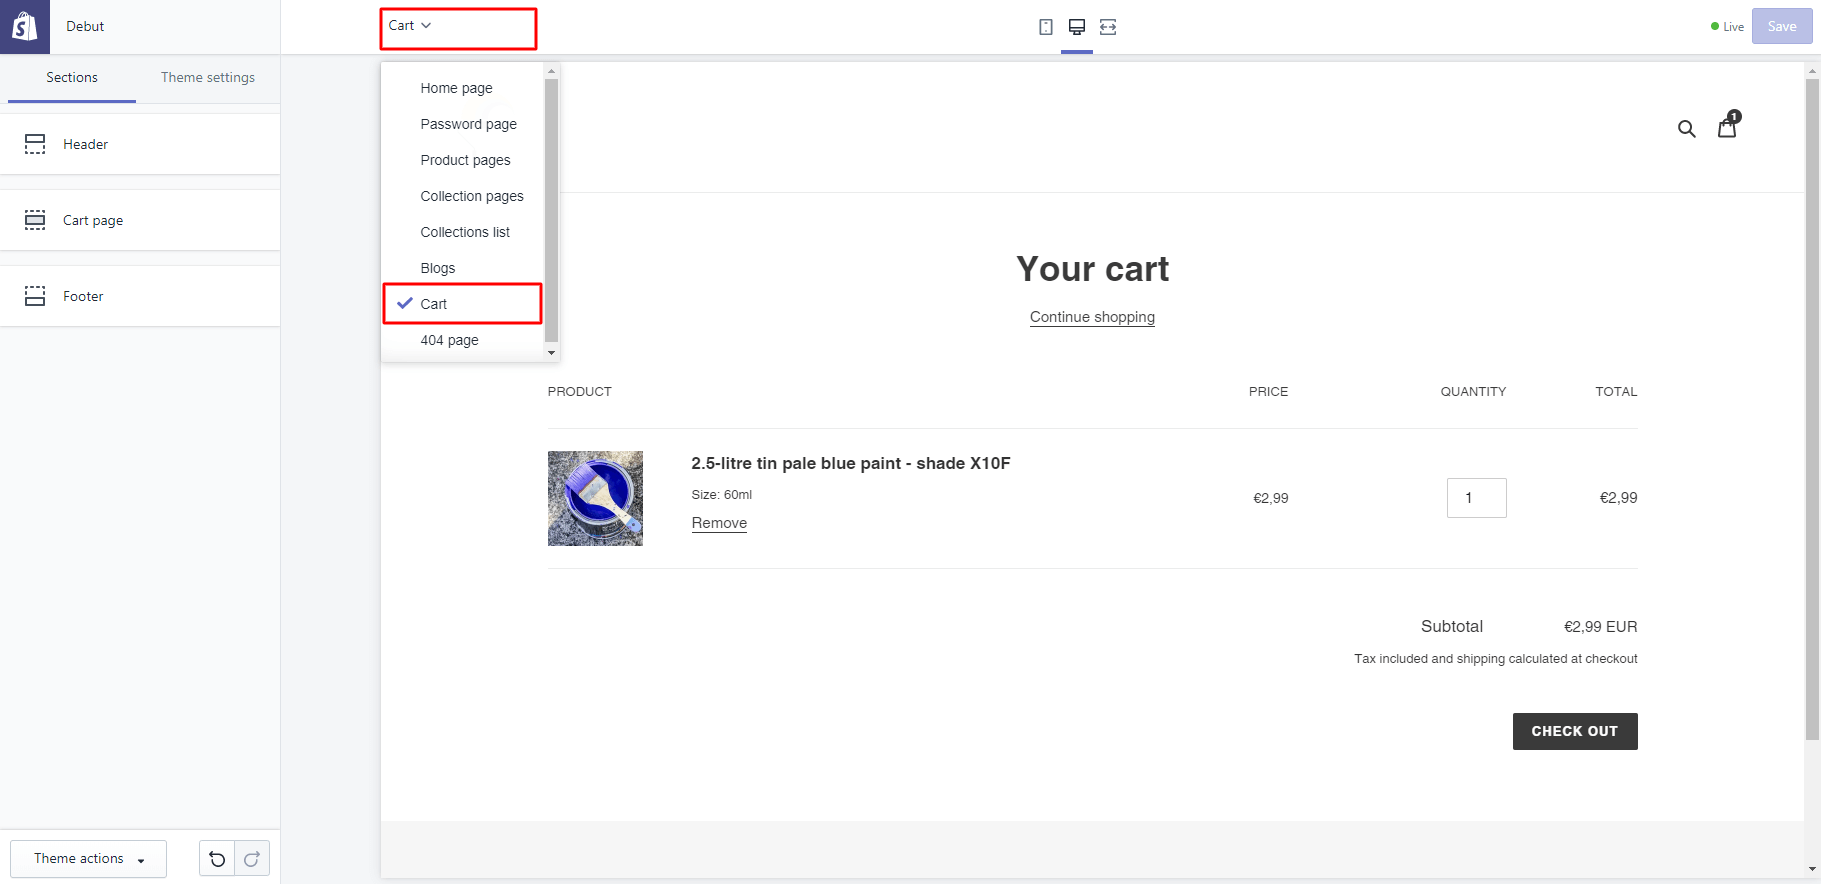
Test out the functionality of your store by adding one of your products to the cart. Now navigate to your cart (via the drop-down arrow at the top of your screen). Can you see the product you’ve just added?
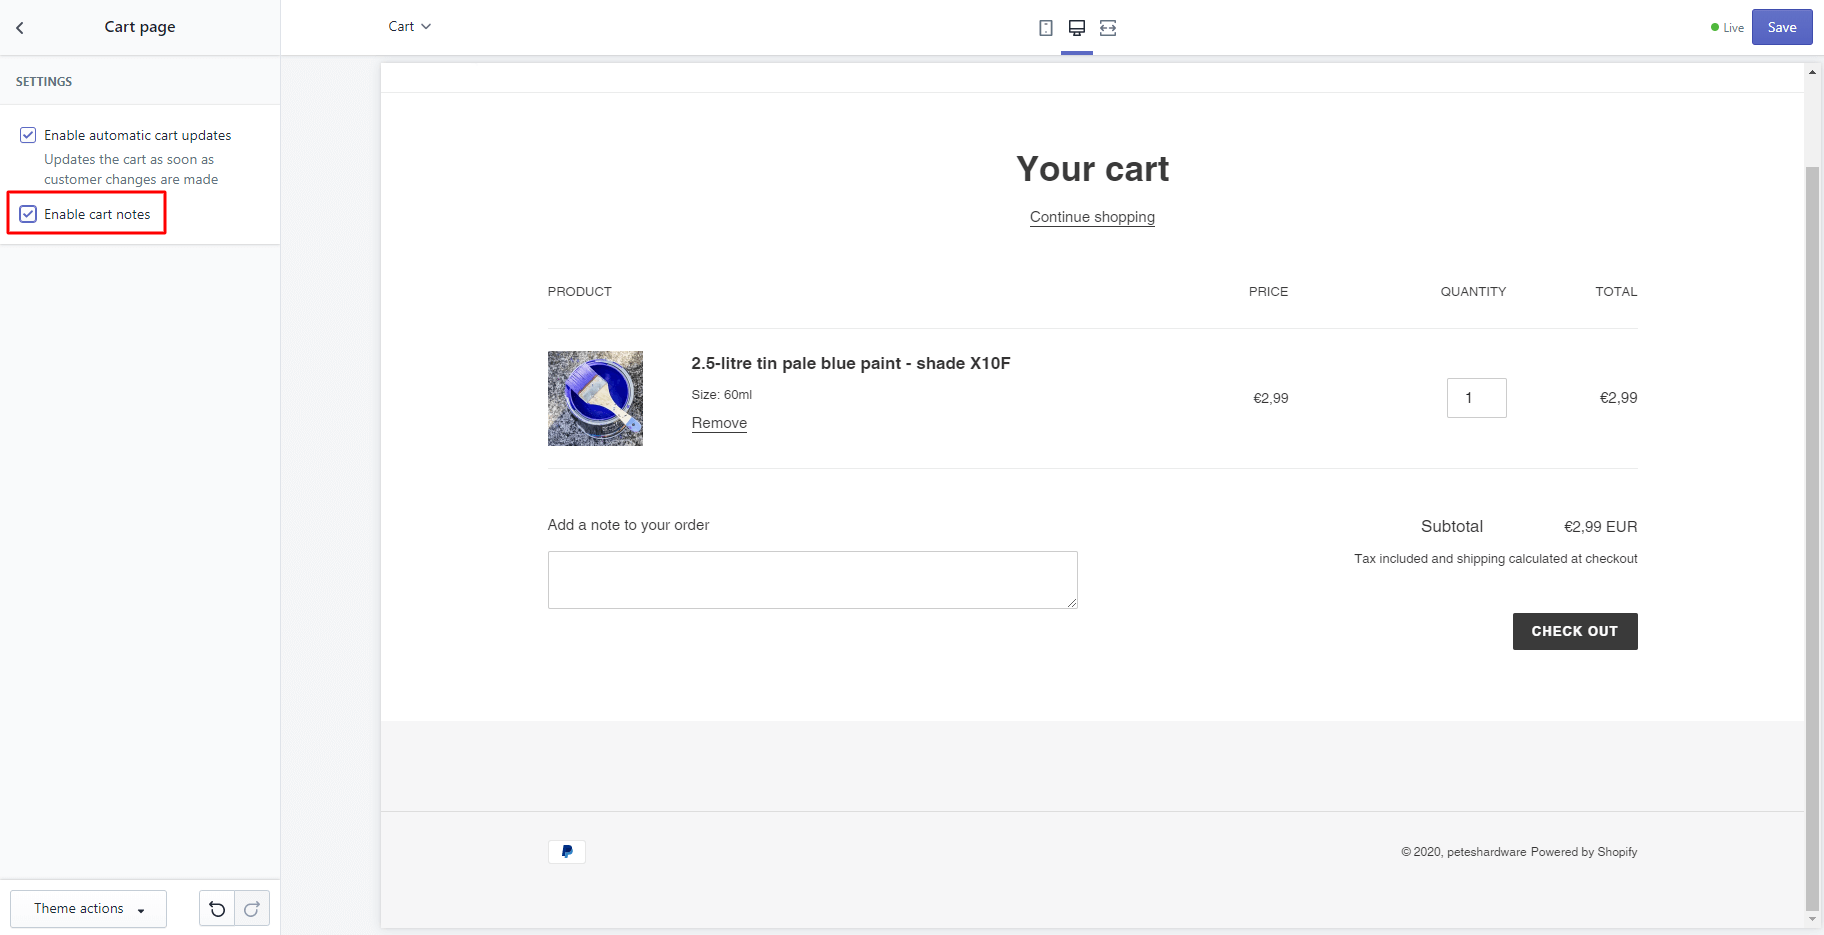
Next, click on ‘Cart page’ via the left-hand menu. Click on ‘Enable cart notes’. This allows your customers to add a note to their order if they want to.
This is all you need to do to customize your theme to start with. Remember to save the changes you’ve made by clicking on the ‘Save’ button located at the top right-hand corner of your dashboard.
Go back to the main menu using the top left arrow and then navigate back to the main Shopify area for your next task - setting up a couple of automated notifications.
Step 3: Setting up automated customer notifications
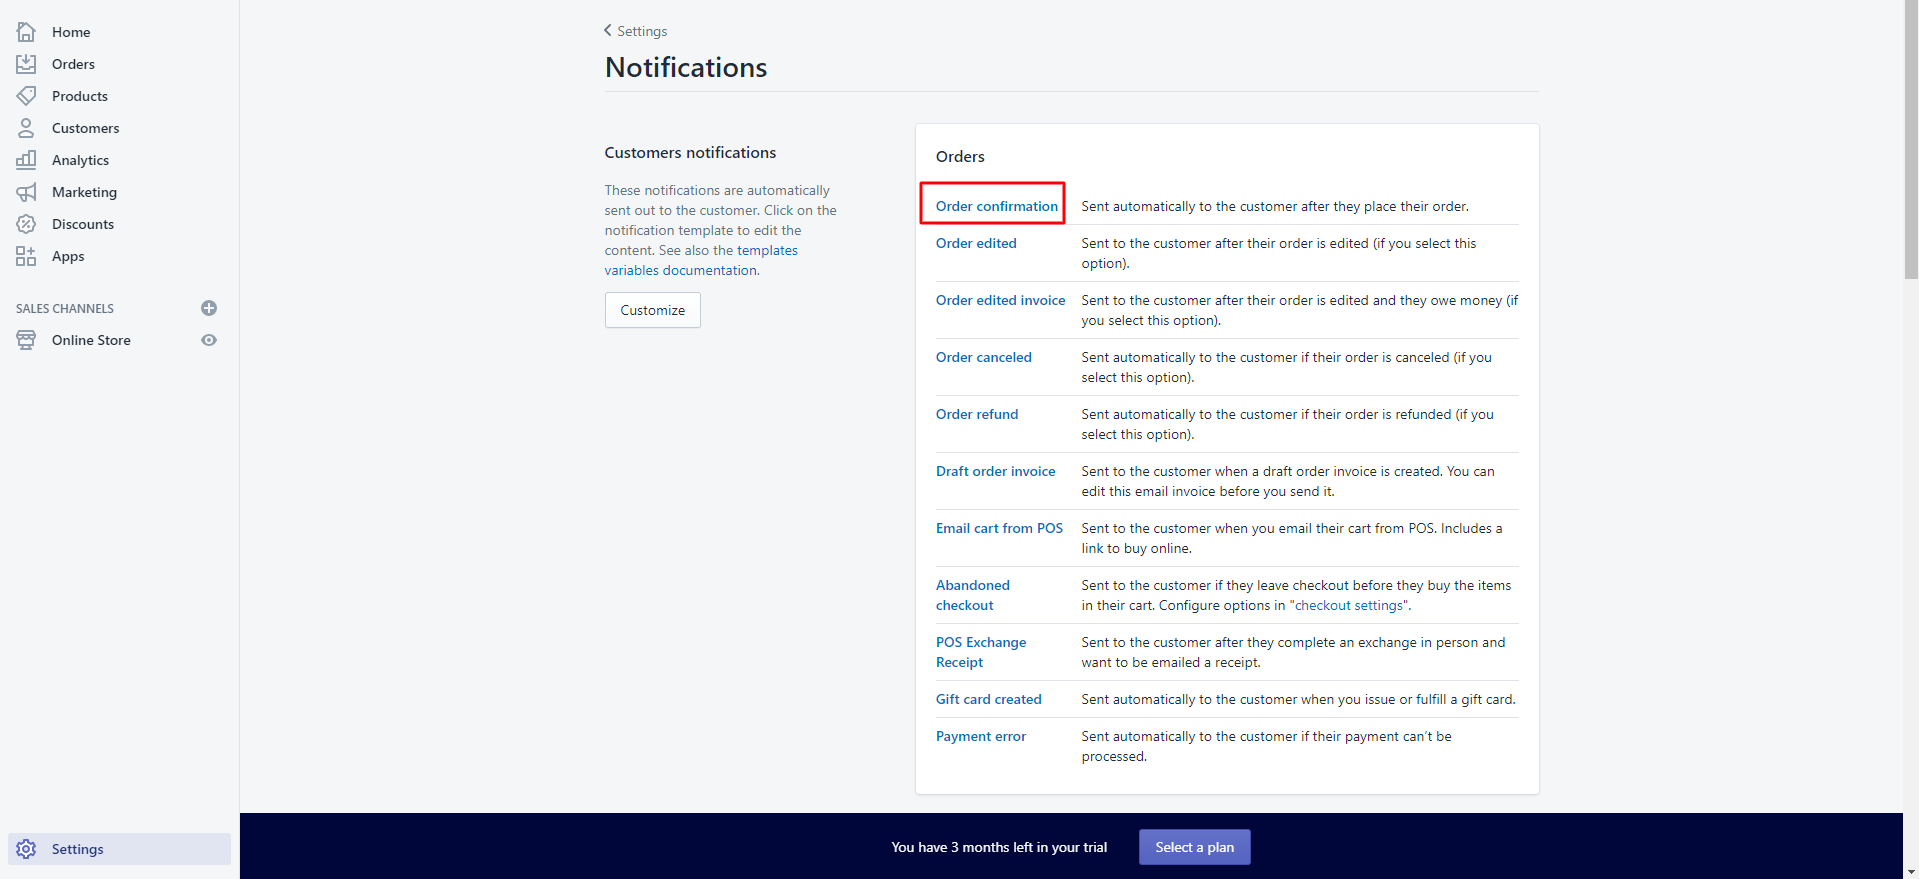
Shopify automatically sends out certain notifications to your customers when they make a purchase. You can edit these. Click on ‘Settings’ then ‘Notifications’ to get started.

Now click on ‘Order confirmation’. This notification confirms the details of the customer’s order.
The standard order confirmation template refers to the order being ‘shipped’. As you’ll be offering a local delivery service, it’s best to change that to ‘delivered’. Click ‘Save’ when you’re done.
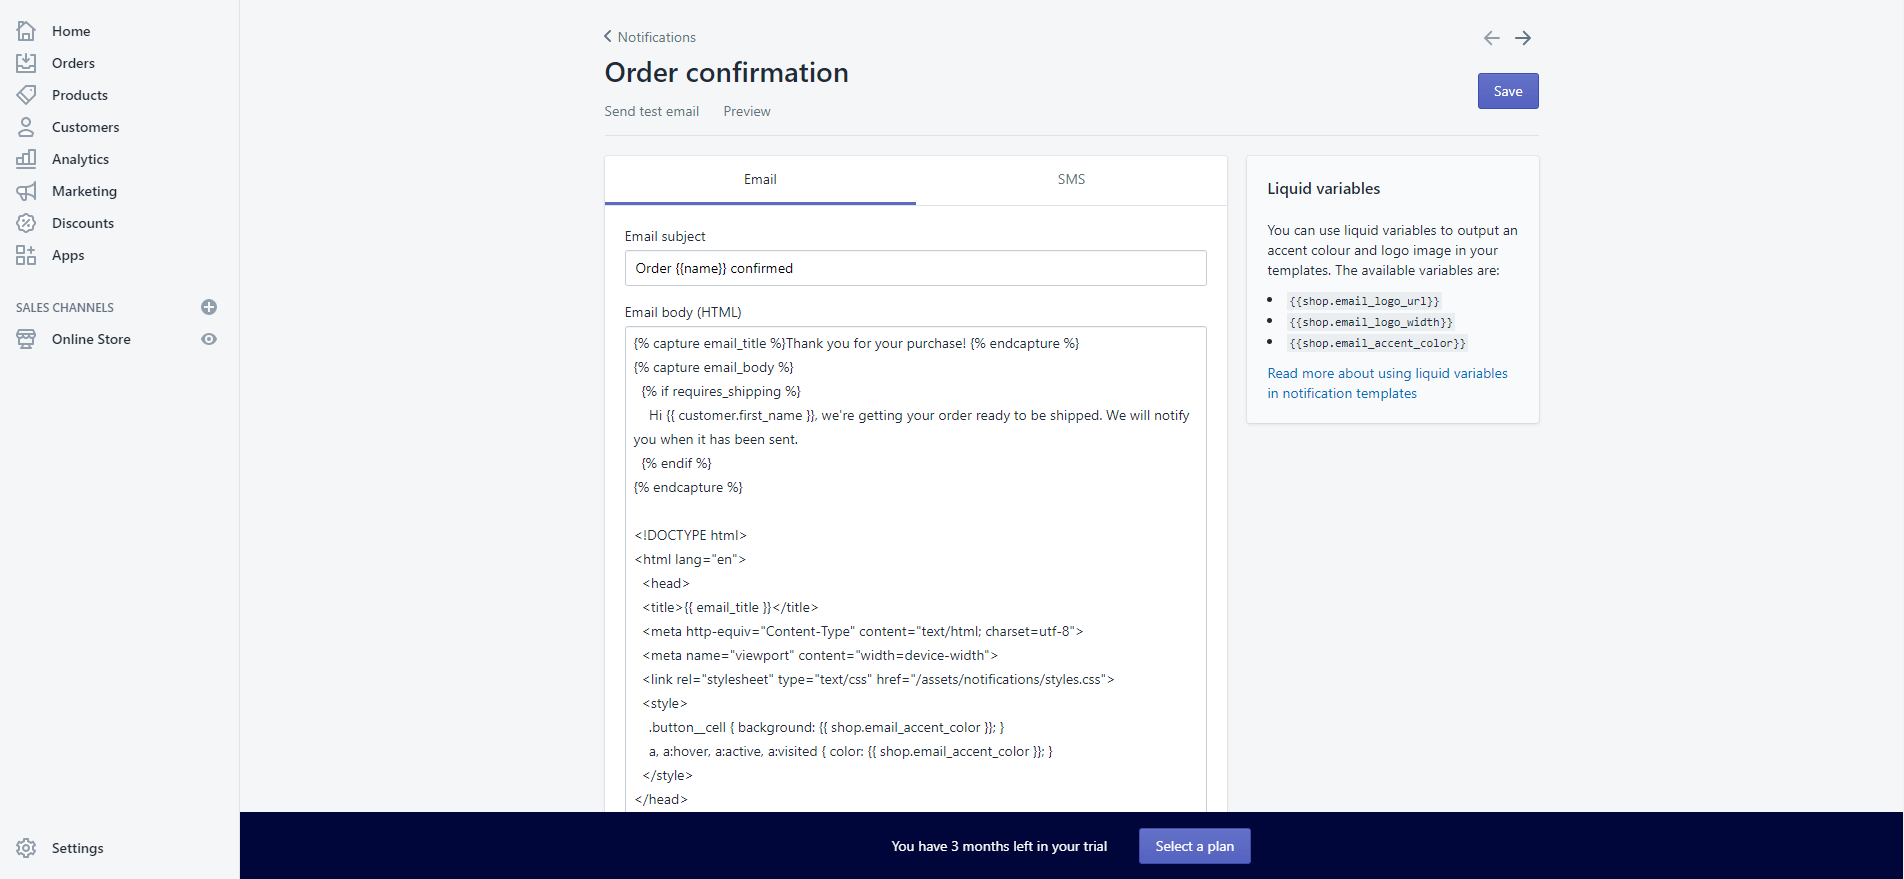
Go back to the list of notifications by clicking the ‘Notifications’ arrow at the top of the screen. Now, locate ‘Shipping confirmation’. This is the notification that is sent when the customer’s order has been shipped. Delete all the preloaded text here.
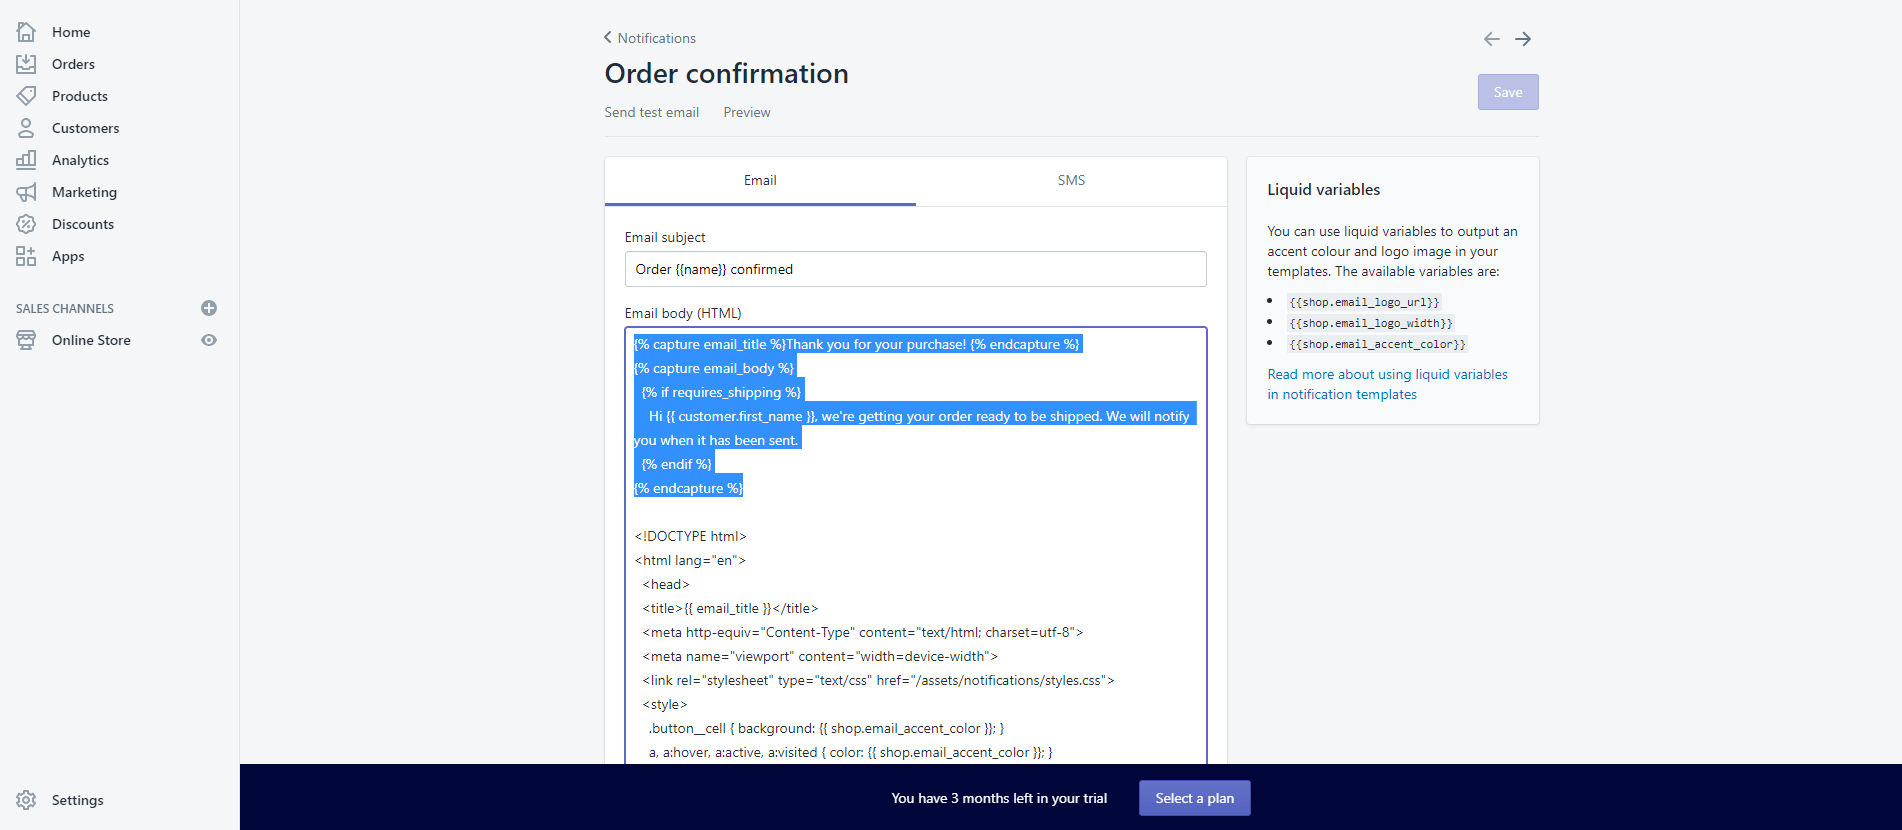
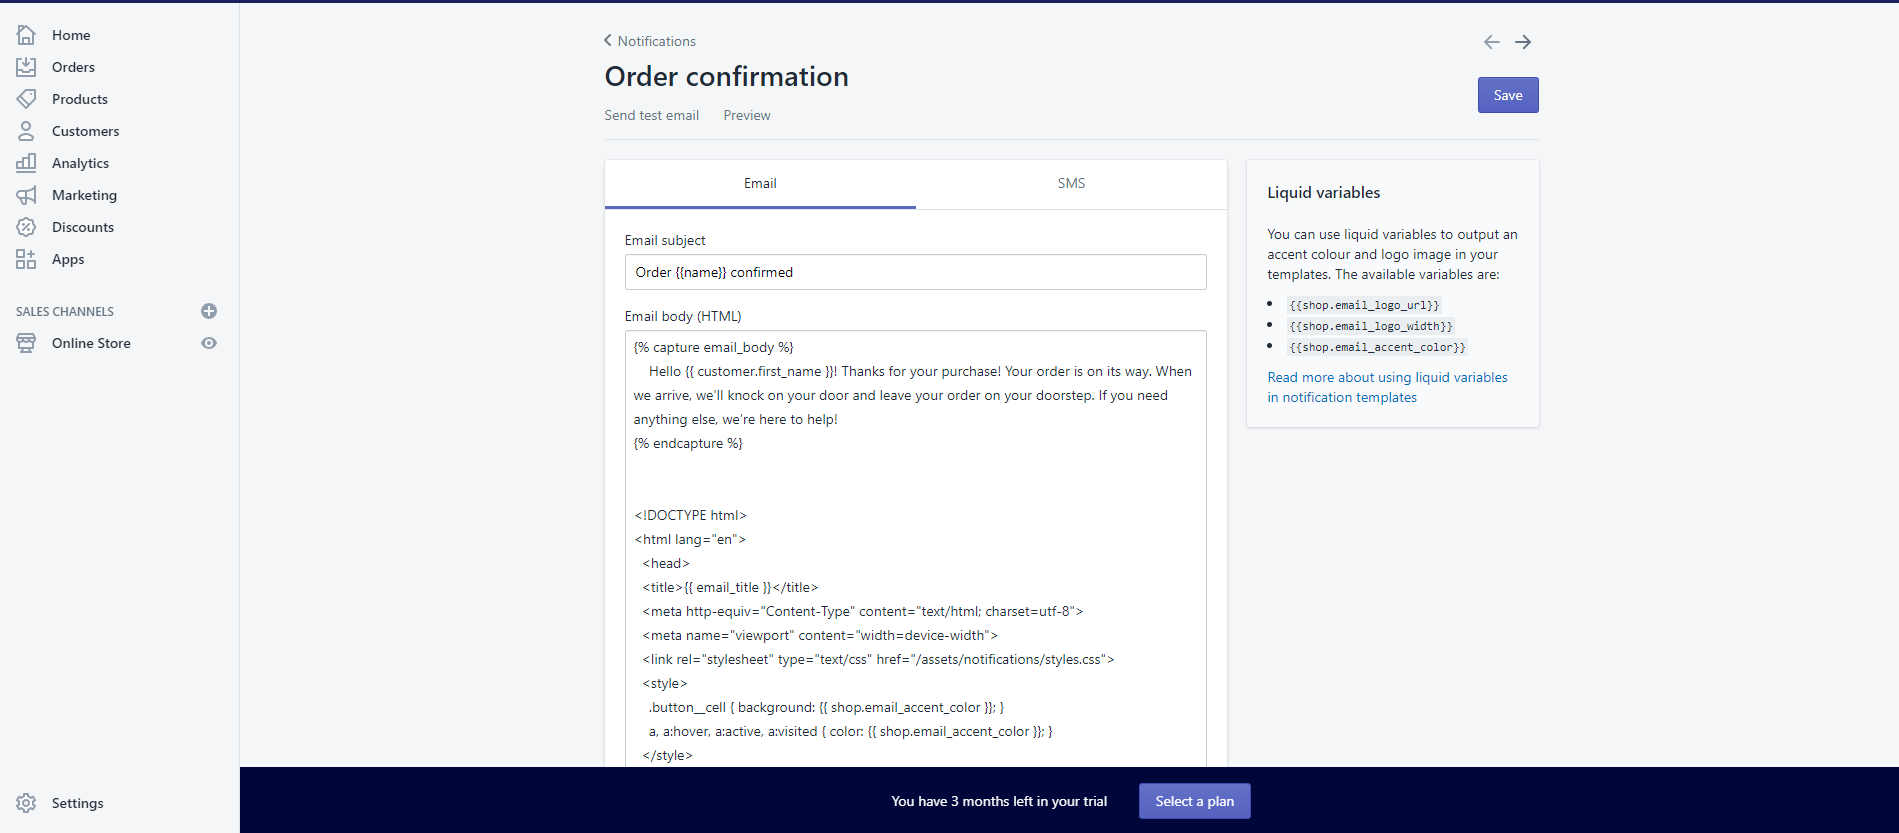
Replace all of that text with the following code:
{% capture email_body %}
Hello {{ customer.first_name }}! Thanks for your purchase! Your order is on its way. When we arrive, we'll knock on your door and leave your order on your doorstep. If you need anything else, we’re here to help!
{% endcapture %}
So the text in the ‘Shipping confirmation’ should now look like this in the screenshot below. Click ‘Save’ when you’re happy with it.
Those are the only notifications you need to modify within Shopify for the purpose of offering a local delivery service to your customers.
Alternatively, if you’ve installed the Firepush app, you can set up order confirmations and delivery notifications really easily without altering any code whatsoever. You just simply fill in a few fields to set up and activate these kinds of messages, which can be sent through web push notifications or via text. Our support team will happily guide you through what you need to do.
Once you’ve sorted out your automated notifications, there’s one more thing you need to do - open your store!
Step 4: Open your store
You’ve signed up to Shopify, added your products, customized your theme and altered some of the notifications. The final step is to make your store accessible for customers. To do this, you’ll need to select a Shopify plan. Click on the blue button ‘Select a plan’ which you’ll see within a big banner on your screen, next to the text ‘You have 3 months left in your trial’.
Select the ‘Basic Shopify’ plan priced at $29 per month by clicking ‘Choose this plan’. You’ll need to enter payment details, but remember, you won’t be charged anything at all for 3 months. By then, with any luck, the coronavirus pandemic might have ended, and the restrictions may have been lifted. Then you can get back to your normal retail operations.
When you’ve gone through this process, go back to your ‘Online Store’, visit ‘Themes’ and click on ‘Disable password’. On the next screen, deselect the checkbox next to ‘Enable password’, then click ‘Save’.
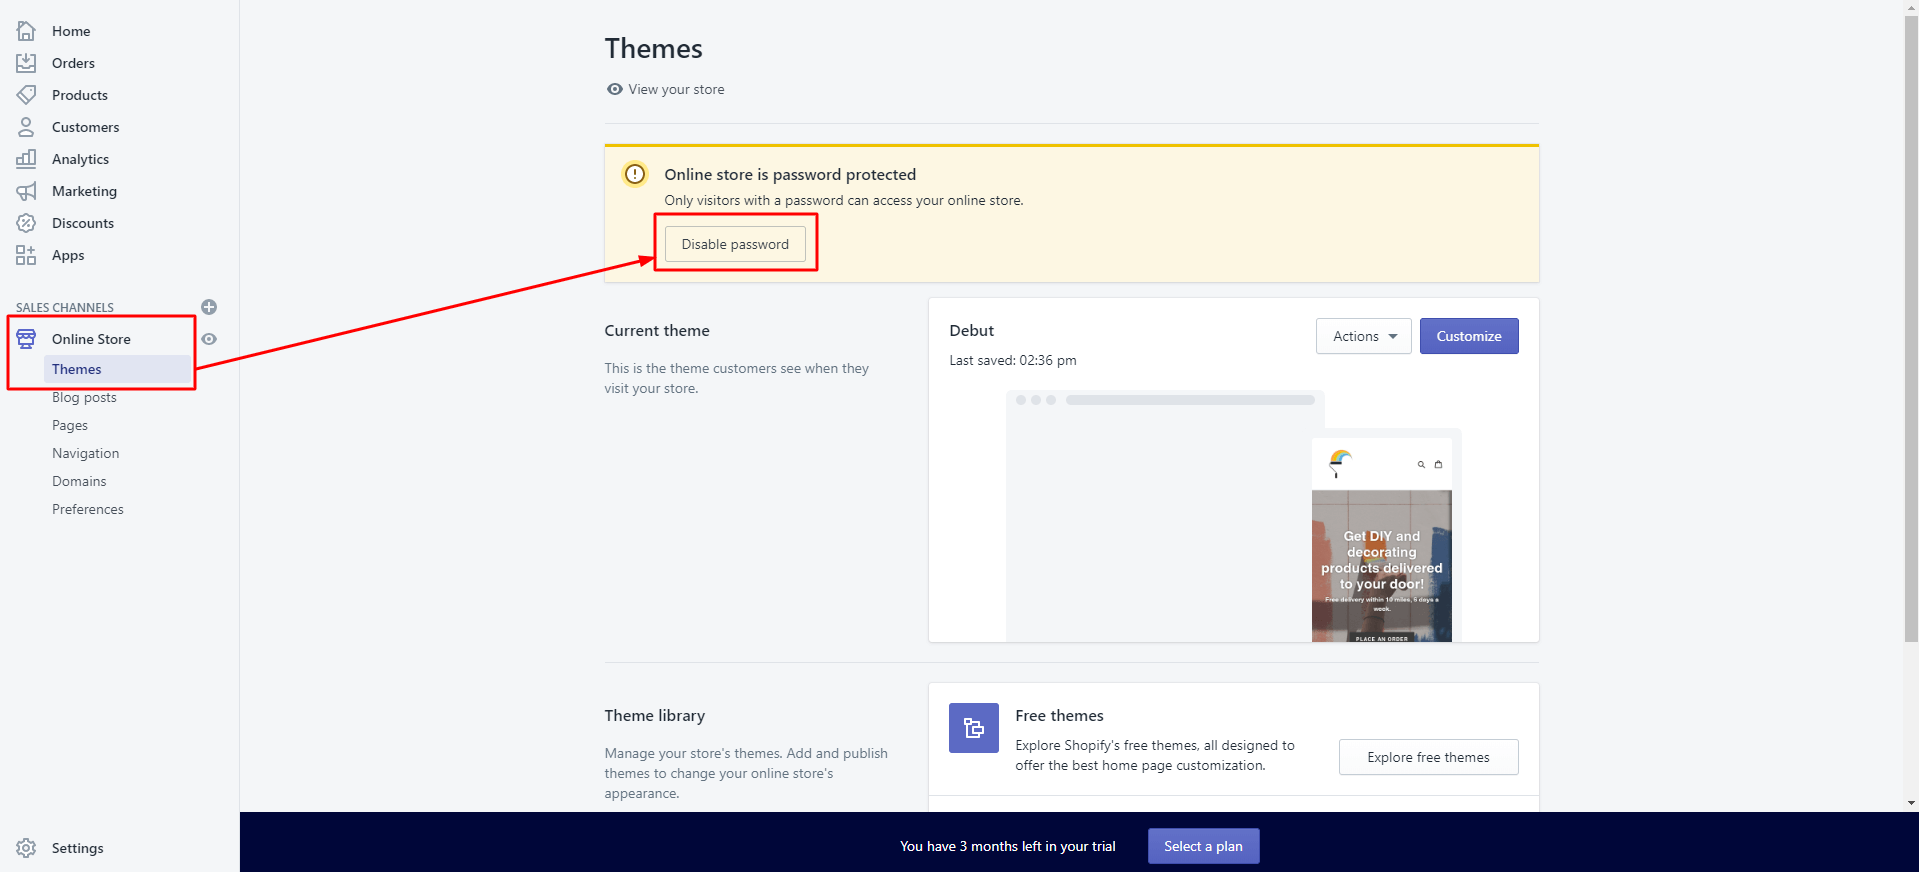
And that’s it, you now have an online store that’s ready and working for your customers. You can share your store URL with anyone who wants to place an order.
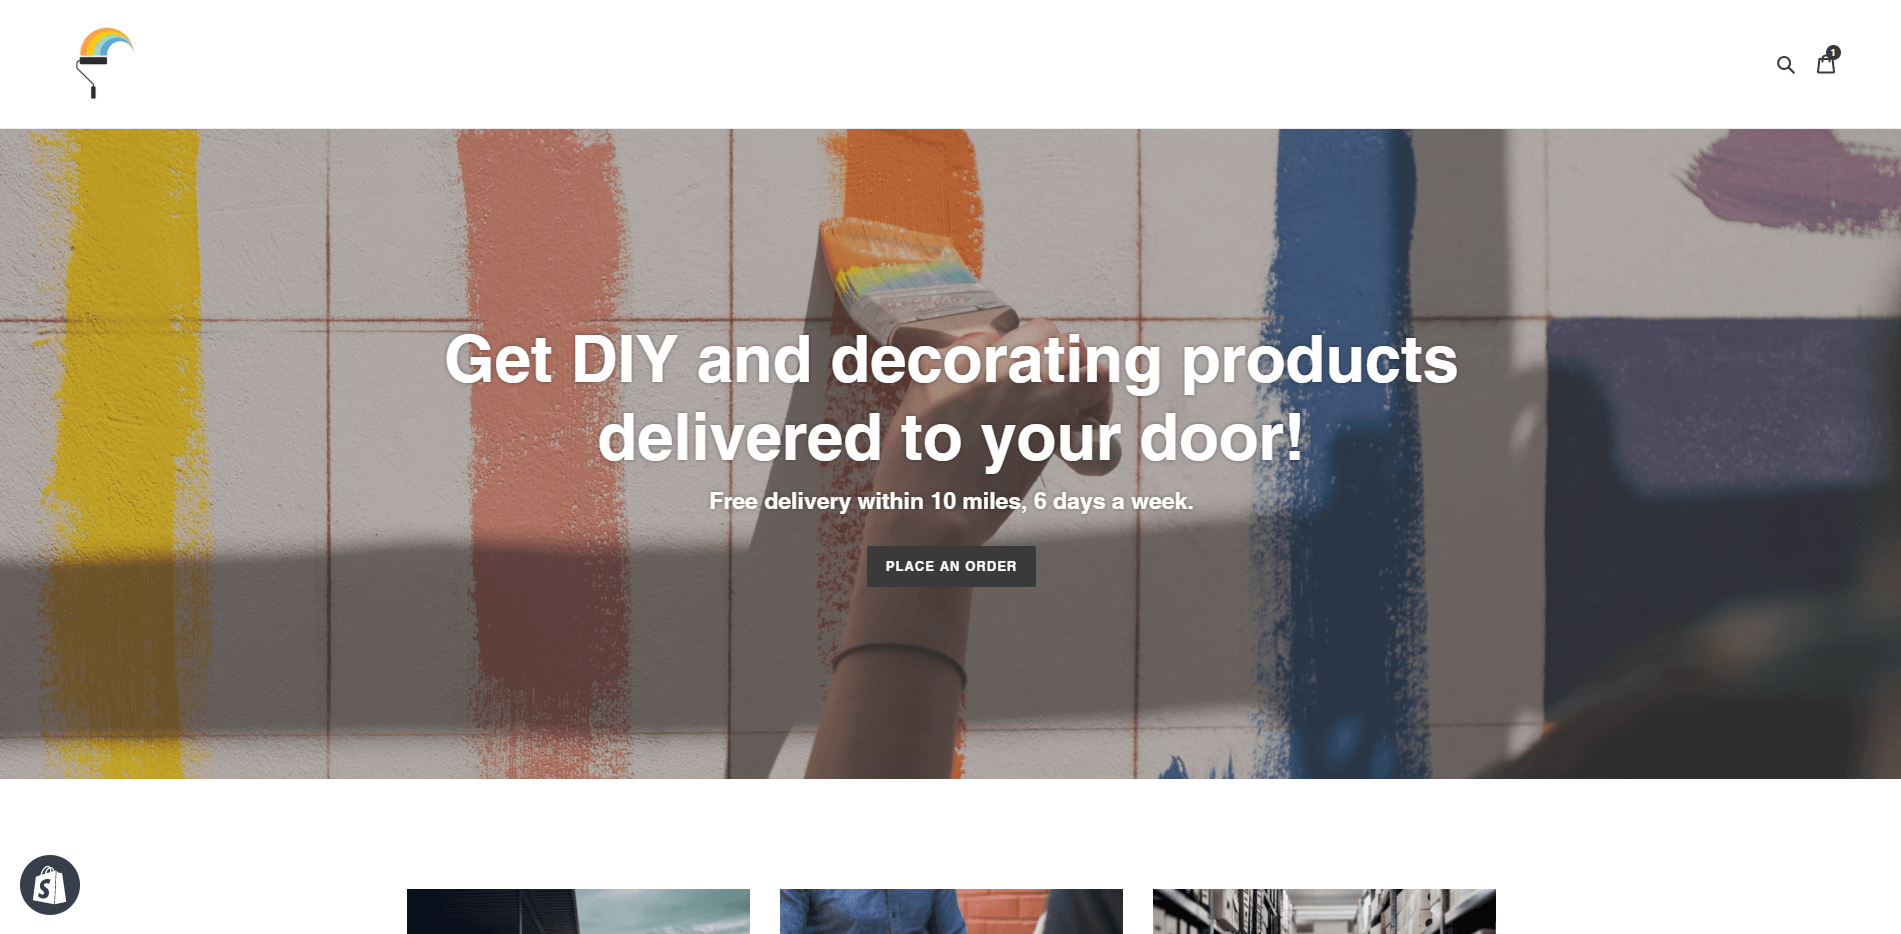
Other information you need to know
You can log into your store to see orders and you’ll also get notified by email whenever an order is placed (this is sent to the email address used when you signed up to Shopify).
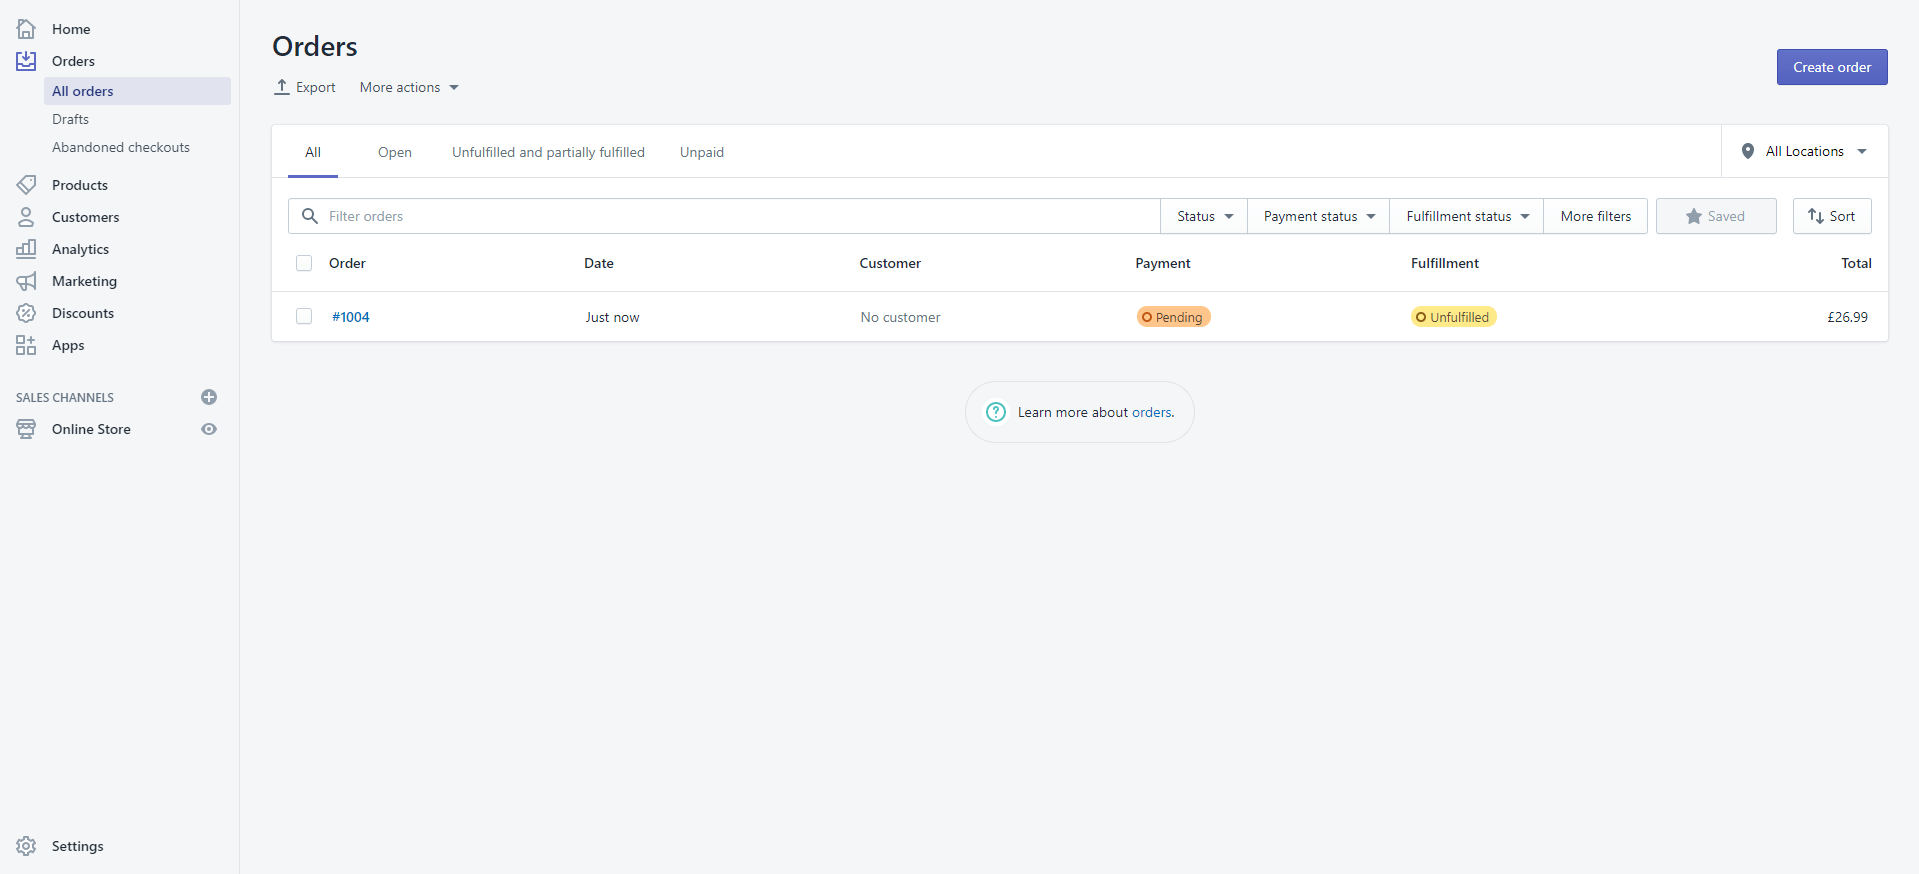
You can view the details of the order by clicking on the order number.
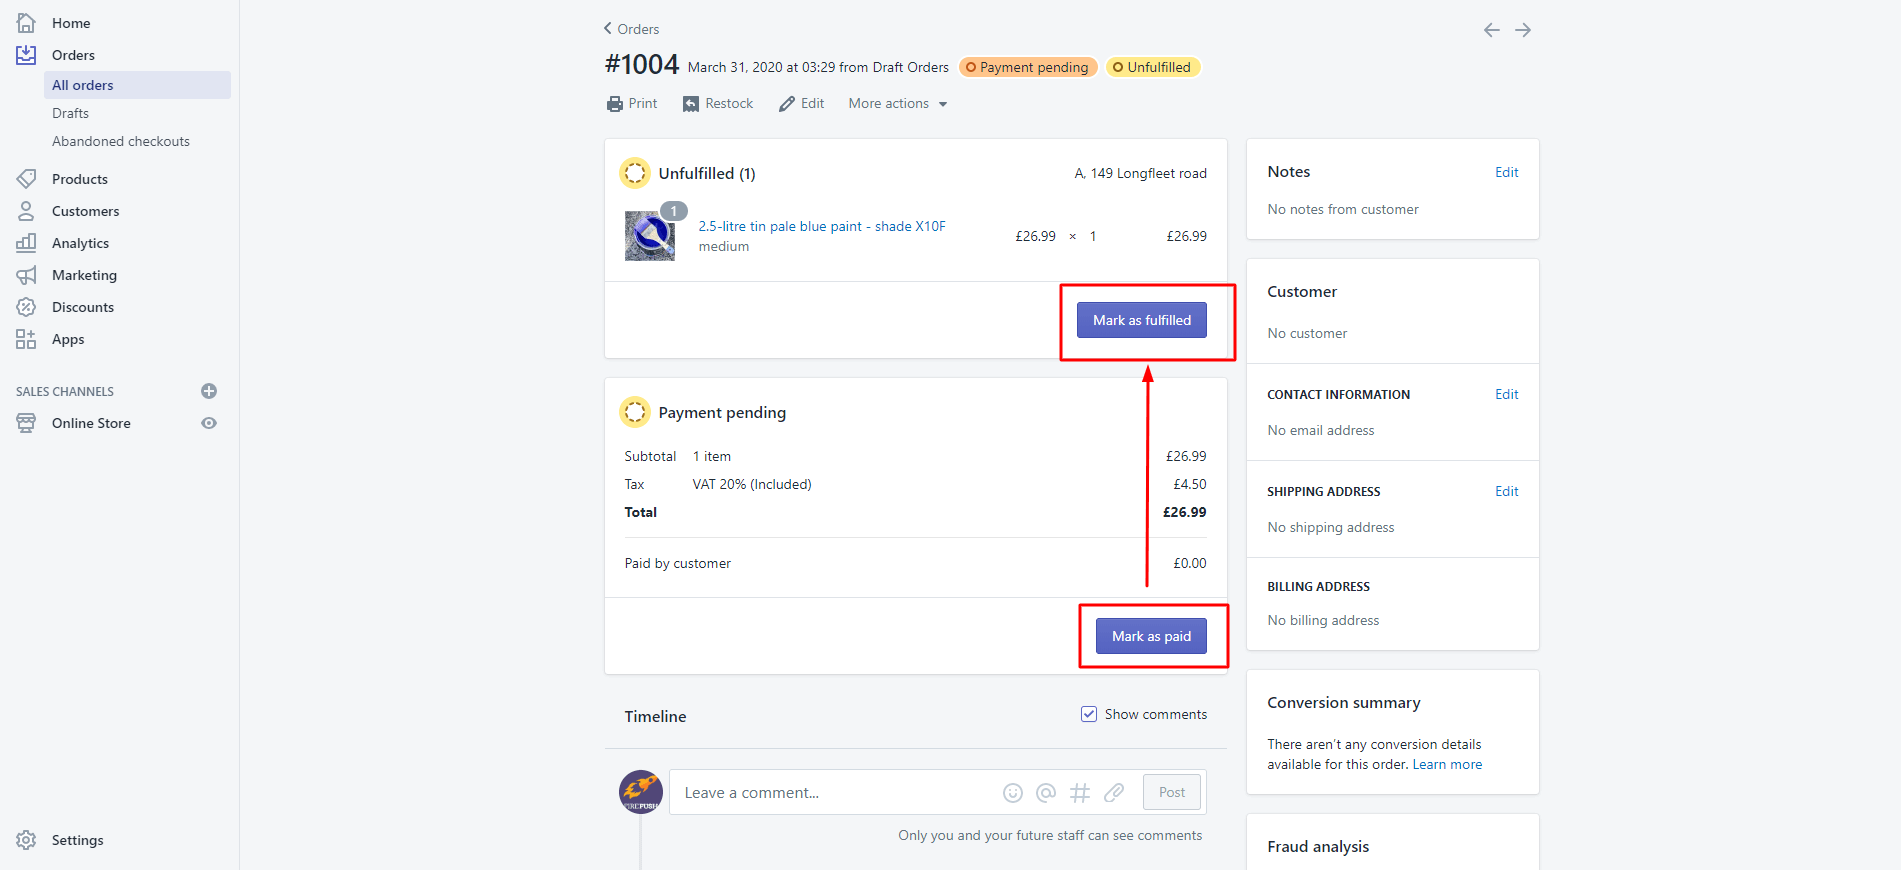
When you’re ready to deliver the order to your customer, click on ‘Capture Payment’. This takes the payment from your customer’s card. Then click on ‘Mark as fulfilled’ - this triggers the shipping confirmation that you altered earlier and notifies the customer that you’re on your way.
We hope you find this Shopify store setup tutorial useful, and that it helps you carry on operating in this time of crisis. To make your business thrive, not just survive, we encourage you to explore strategies that will help you get more online conversions and increase your revenue. This involves getting more traffic to your store, converting that traffic into paying customers and retaining existing customers to land repeat business. Read our detailed guide on how to optimize your Shopify store for more profit.
Firepush offers dedicated support and FREE consultations to find right strategy for you
Book my demoFor further reading, you can find helpful resources and articles about Shopify in Shopify Help Centre.
The latest guidance about coronavirus (COVID-19). Moreover, other Shopify alternatives like 3dcart are also offering 90-days free of service to help businesses affected by the pandemic.

